
In This Article
- Overview
- Step 1: Create an Additional Business
- Step 2: Set Up Its Paylution Account
- Linking Multiple Locations to One Bank Account
- Switching Between Locations
- Frequently Asked Questions
Overview
Quivers manages each of your retail locations as its own business, with its own Retailer Panel, inventory, orders, and Seller connections. If you operate more than one storefront, you'll create an additional Quivers business for each location — even though you can access all of them from the same login.
Step 1: Create an Additional Business
1. From any Quivers Retailer Panel, click your business name in the top right corner.
2. Select Create Business from the dropdown.
3. Complete the Create a Fulfiller Business screen with the new location's details — business name, address, and so on.
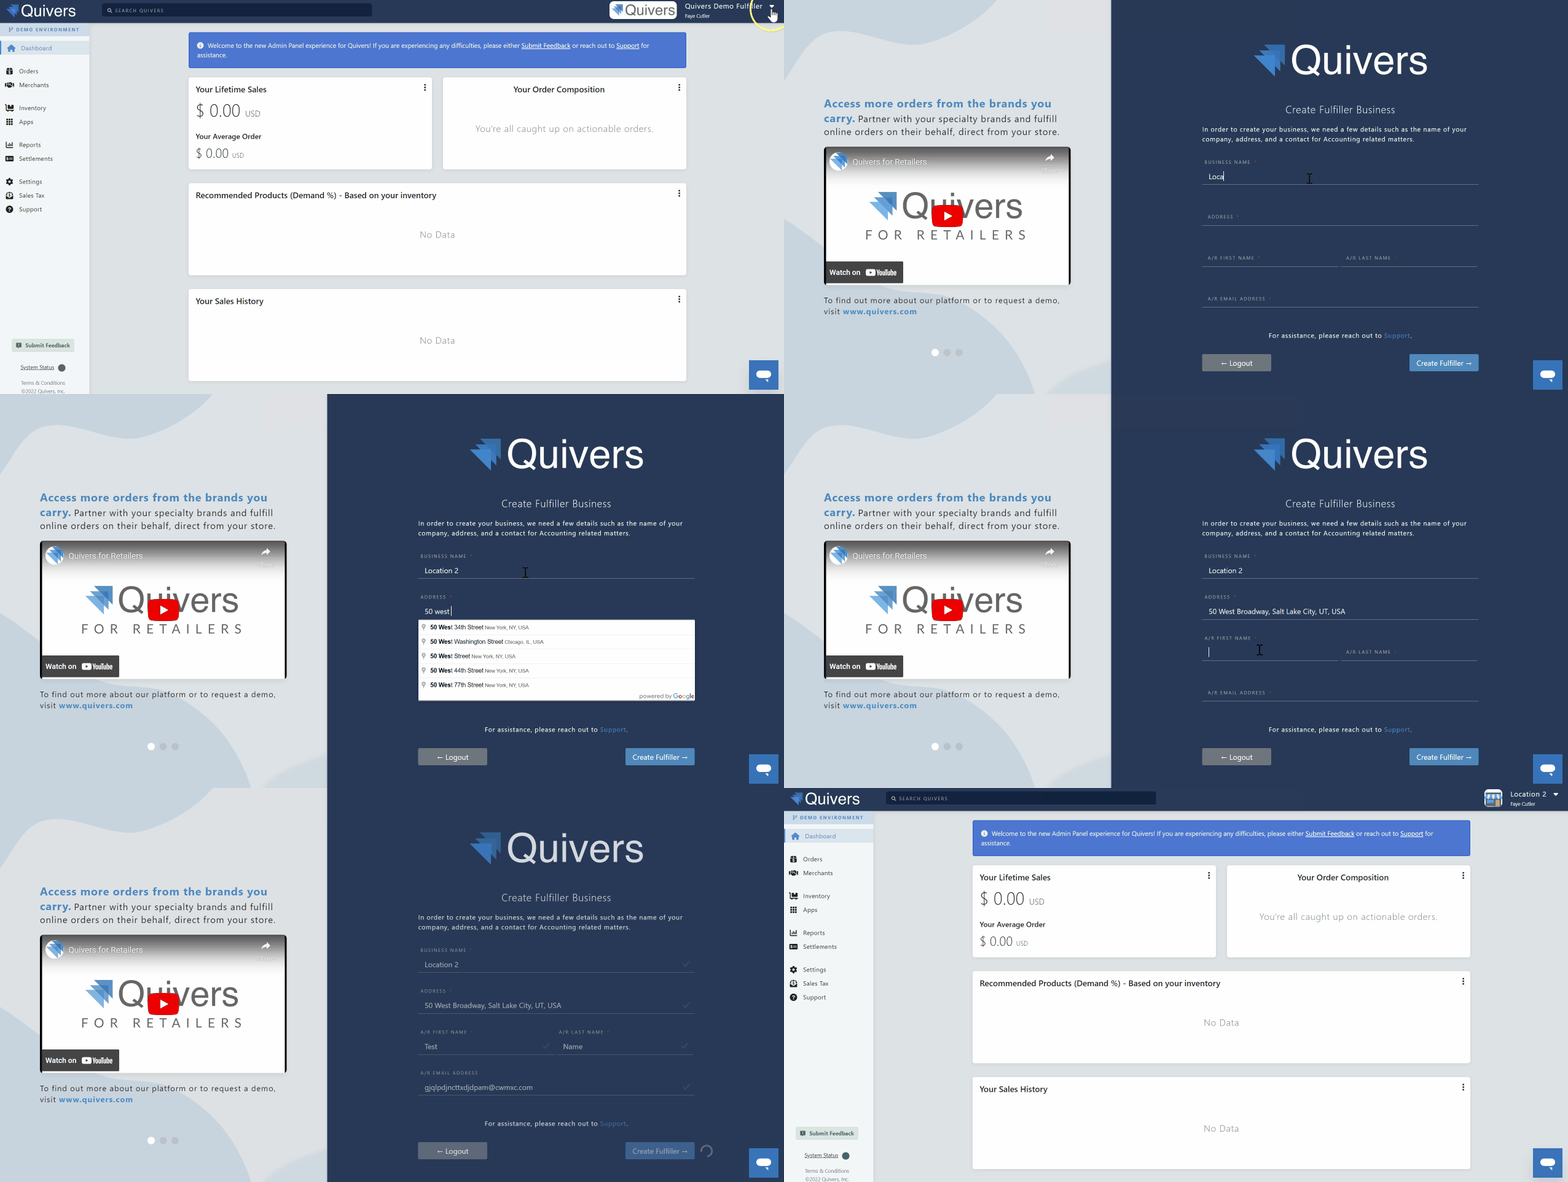
Note: This creates a fully separate Retailer Panel for that location, with its own inventory, Seller connections, and orders. Once it's created, treat it like a brand-new business and work back through the Setup Checklist for that location.
Step 2: Set Up Its Paylution Account
Each business location needs its own Paylution settlement account, since payouts are tracked per location rather than per login. When you set up Paylution for the new location, use a unique accounting email address — one that isn't already tied to another Paylution account on Quivers.
Note: Reusing an email address already registered to another location's Paylution account won't work. Each location's Paylution contact must be a distinct email address, even if the same person manages payouts for all of your locations — for example, ap+location2@yourbusiness.com.
Linking Multiple Locations to One Bank Account
Each location gets its own distinct Paylution wallet (see Step 2), but some multi-location businesses want all of those wallets to settle into a single shared bank account rather than managing several. That mapping isn't self-service inside Quivers — it's done manually by the Paylution team on request.
Note: Paylution can typically link up to two wallets to the same banking details on its own. Beyond that, you'll need to ask the Paylution team to manually map the additional wallets to your bank account.
To request it, email the Paylution team directly with the wallet number and the primary account's banking details for each additional location you want linked to the same bank account:
- support@paylution.com
- hwclientcare@paypal.com
- clientcare@hyperwallet.com
The Paylution team will confirm once the wallets are mapped. From the Quivers side, nothing else changes: to check the balance for a specific location, you'll still enter that location's merchant ID and its associated Paylution email address — only where the settlement funds land is different.
Best Practice: If you'd rather not coordinate with Paylution directly, contact support@quivers.com with your wallet numbers and we can help facilitate the request.
Switching Between Locations
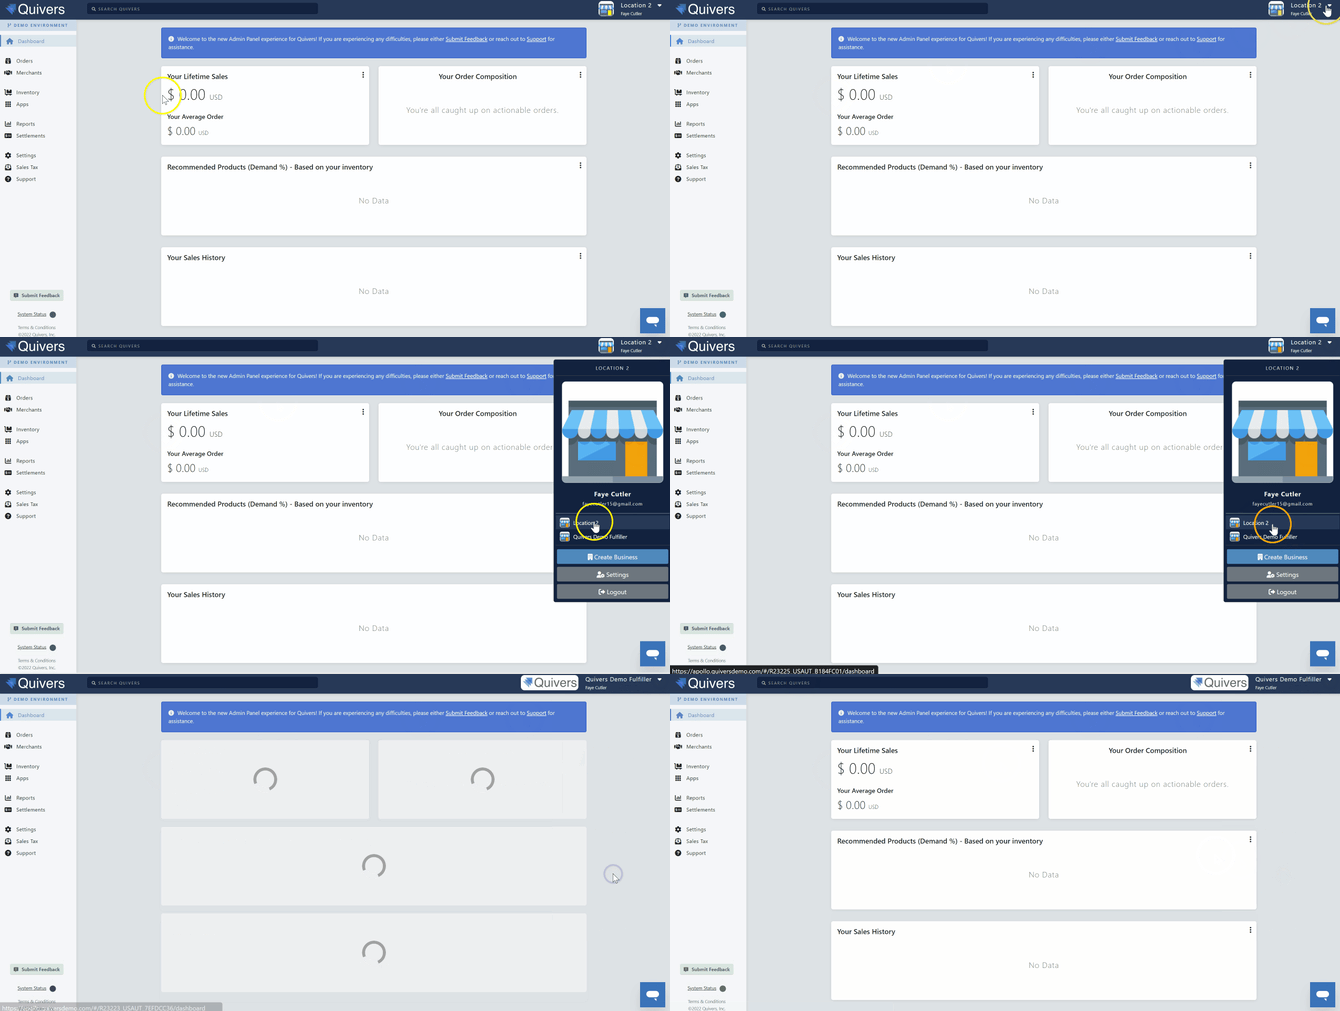
You can move between your businesses without logging out. Click your business name in the top right corner and select the location you want to view from the dropdown. Each location's Orders, Inventory, and Settings are entirely separate from one another.
Frequently Asked Questions
Do I need a separate login for each location?
No. One Quivers user login can access multiple businesses — switch between them from the business-name dropdown in the top right.
Can locations share inventory?
No. Inventory is tracked separately per location, so you'll need to sync each location's stock independently.
Do I need to redo the Setup Checklist for each location?
Yes. Treat each additional location as its own business: complete its business details, inventory, Seller connections, and team members separately.
Can I use the same accounting email for Paylution across locations?
No. Each location requires a unique accounting email that isn't already tied to an existing Paylution account — a shared inbox with a "+" alias (like ap+location2@yourbusiness.com) is a common way to keep them distinct while still landing in one place.
Do I need to reconnect with Sellers for each location?
Yes. Seller connections are set per business, so you'll need to connect (or be connected) with each Seller separately for every location.
Can I have all my locations settle into a single bank account?
Yes, though it's a manual request rather than something you configure yourself in Quivers. See Linking Multiple Locations to One Bank Account above — you (or Support, on your behalf) will need to contact the Paylution team directly with each location's wallet number.
Is there a limit to how many locations can share a bank account?
Paylution can usually link up to two wallets to the same banking details automatically. Linking a third or more requires the manual mapping process, done by the Paylution team on request.