Quivers Integration Extension Package
- The following details are provided from Quivers:
- Quivers API key
- Business RefId
- Stripe publishable and Private Key (if using Quivers Pay)
- PayPal Client Id and Client Secret (if using Quivers Pay)
-
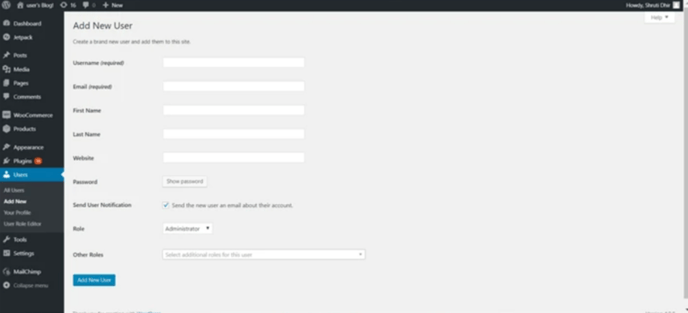
Add admin user
- On the side menu in the dashboard, go to Users > Add new
- Fill out the Account Information form generated.
- Click on show password. Use the password generated or add a new one in the field.
- Set role as administrator.
- You will need these when setting up the connection in the Quivers plugin.
- Click on 'Add New User.'
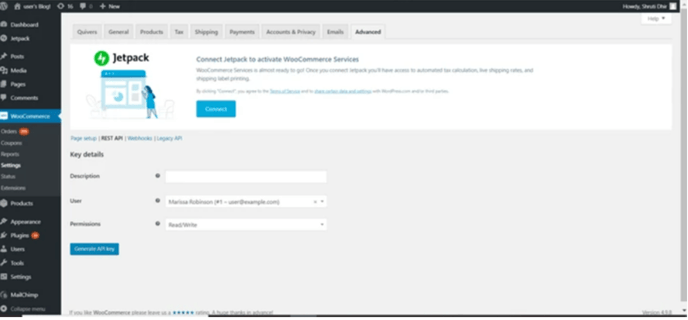
Configure REST API in WooCommerce
- On the side menu in the dashboard, go to WooCommerce > Settings
- Click on the 'Advanced' Tab. Select REST API present right above the header 'Page Setup'.
- Select 'Add Key.'
- User - Add a user from the admin users created by you in the 'Add admin user' section.
- Set Permissions to Read/Write.
- Generate an API key.
Quivers Plugin Installation
- Log in to your WooCommerce account as an administrator
- On the side menu in the Dashboard, click on Plugins > Add New
- At the top, next to 'Add Plugins', click on Upload Plugin
- Now click on “Choose file” and select the Quivers Extension package
- Click Install Now (Please check the troubleshooting section in case if you face any errors/problems in installation)
- For Linux users,
- Unzip the file using ‘unzip quivers_plugin_woocommerce.zip.’
- Copy the file to the following path: ‘path_to_wordpress’/wp-content/plugins/'
- On the side menu in the Dashboard, click on Plugins > Installed Plugins
- You should be able to see a list of plugins on the screen
- Scroll down and find 'Quivers.' Click on Activate.
Configuration
- Configure Stripe
- Log in to your WooCommerce Account as an administrator
- Go to WooCommerce > Settings > Payments
- Scroll down and enable ‘Pay by Card’ and click Set Up.
- Check 'Enable Quivers Gateway.'
- Set an appropriate title, e.g. - 'Pay by Card.
- Check 'Enable test mode' if you use the extension in your test environment. For testing purposes, this should always be 'checked'.
- In “Live Publishable Key,” enter the public key provided by your project manager at Quivers.
- In “Live Private Key,” enter the secret key provided by your project manager at Quivers.
- Set minimum order total as per your requirement. The minimum order amount supported by Stripe is $0.50.
- Click on Save changes.
Note - You only need to configure this if you are using Quivers Pay

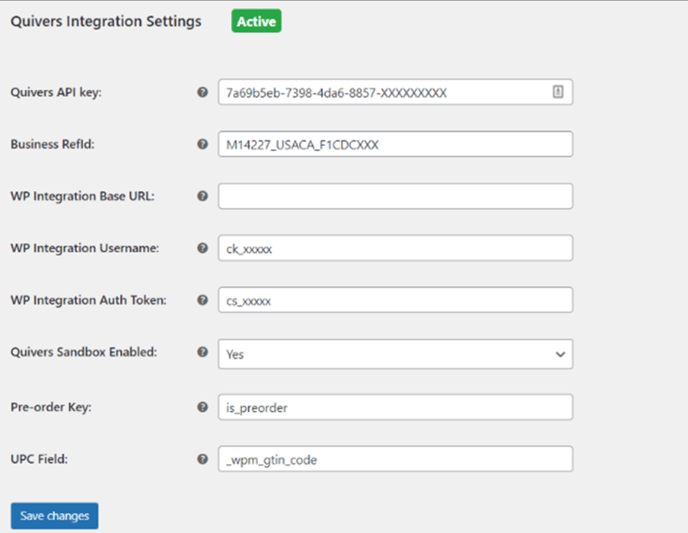
Configure Quivers Settings
- On the side menu in the Dashboard, click on WooCommerce > Settings.
- Click on the 'Quivers' Tab.
- Go to the Quivers Integration Settings section and add all the required fields.
- In Business RefId enter the Id of your business provided by your project manager at Quivers.
- In WP integration Base URL, enter the base URL of the WooCommerce site.
- In WP integration Username, enter the consumer key (ck_xxx) you received from configuring the REST API
- In WP integration auth Token, enter the consumer secret (cs_xxx) respectively you received from configuring the REST API
- Set Quivers Sandbox Enabled to 'Yes' if you use the extension in your test environment. For testing purposes, this should always be set to Yes.
- UPC Field - Since UPC isn't a standard field in WooCommerce, you can use this field to provide the custom field you created on the product page to refer to when syncing UPCs. Please note that you should provide the field name from the API that represents your UPC field on the UI
- Pre-order Key - Since "pre-order" isn't a standard field in WooCommerce, you can use this field, to provide the custom field you created on the product page to refer to when marking a product for 'pre-order.' Please note that you should provide the field name from the API that represents your
pre-order field on the UI - Save the configurations.
Configure Quivers Tax
- Go to WooCommerce > Settings > Quivers Tax
- Next to each currency, you configured on your site on WooCommerce, select its corresponding marketplace (storefront) on Quivers from the marketplace drop-down.
- You can also multi-select the 'Claiming groups (policy)' to which you wish the products for a storefront should map. Claiming Policies on Quivers enable Retailers to be notified about orders for certain products.
- If you wish to bypass retailer visibility on some products on Quivers, we recommend the following approach -
- Set up a blacklist claiming policy on Quivers
- Select those products that you to be brand exclusive in this policy under the Restrict by Catalog section
- On WooCommerce > Settings > Quivers tax, deselect or do not map the blacklisted claiming policy to any marketplaces. This way, all the products except those that are blacklisted will be shared with the retailers on Quivers.
- Save changes
Note - Disable all the pre-existing tax configurations on WooCommerce as Quivers will be responsible for calculating taxes on checkout.

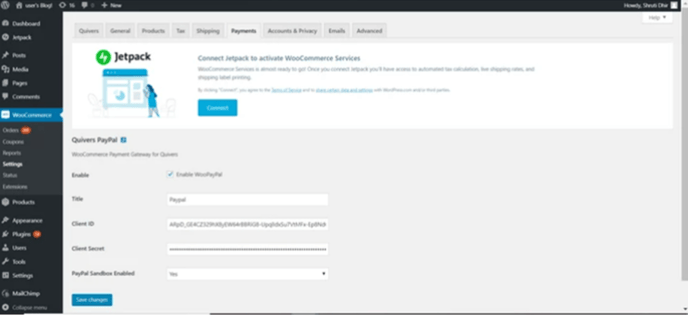
Configure PayPal
- Log in to your WooCommerce Account as an administrator
- Go to WooCommerce > Settings > Payments
- Scroll down, enable ‘Quivers PayPal - Paypal’, and click Set Up.
- Check 'Enable PayPal'
- Set an appropriate title, e.g. - 'PayPal.'
- In “Client Id” enter the PayPal Client Id provided by your project manager at Quivers.
- In “Client Secret” enter the PayPal Client Secret provided by your project manager at Quivers.
- Set PayPal Sandbox Enabled to 'Yes' if you use the extension in your test environment. For testing purposes, this should always be set to 'Yes'
- Click on Save changes.
Note - You only need to configure this if you are using Quivers Pay
Troubleshooting
Quivers Plugin configuration:
- If Quivers Tax configuration is unable to save properly, make sure all data points are valid and correct.
- If Stripe payment UI is not loading, then make sure that the entered API keys are correct.