A HoverCart comes from a Storefront (Marketplace) created on Quivers. Each Storefront is composed of a price type and a selection of products. Once you have created a Storefront on Quivers, a HoverCart code will be available to implement that Storefront onto a website.
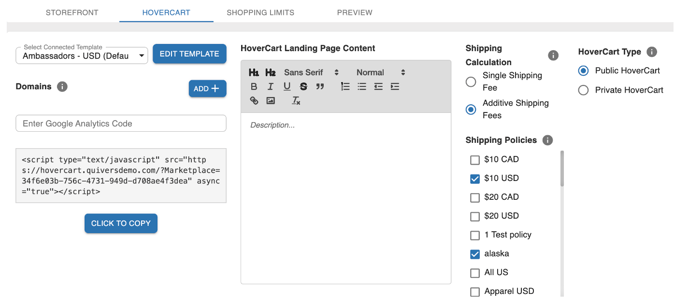
You can find the HoverCart code by selecting any of the Storefronts under the "Marketplaces" navigation item in the left-hand rail of your Quivers Admin Panel, then clicking the "HoverCart" button at the top of the right-hand side content:
Once you have the HoverCart code, there are 2 main styles to choose from to display the Storefront/HoverCart on your website. The first style is embedded add to cart and the second is embedded store. There are different reasons businesses choose either option.
Let's take a look at the setups for each to find which best fits your business needs.
Embedded Add to Cart
The embedded add to cart is an add to cart button that can be placed anywhere on your site to create the ability for your products to be purchased.
The embedded add to cart provides a flexible way to configure a product page experience unique to your business. It is a minimalistic approach to adding the Quivers shopping cart to your site.
This setup works best for businesses which already have product pages they would like Quivers to fit into. This setup allows for any page with SEO or other plugins to utilize the add to cart configuration.
Here are some examples of sites utilizing the Embedded Add to Cart. The areas produced by Quivers are highlighted in the blue box:

How does it work?
The add to cart button uses the HoverCart javascript code in the header of the site paired with a snippet of HTML that generates the add to cart button.
<div data-widget="PRODUCT.ID"></div>
What is the PRODUCT.ID value in the above HTML code?
The Product.ID used in the html for the embedded add to cart button is a product ID that is produced when a product is uploaded or created in Quivers. This ID is unique to that product, and no other product will ever be able to have that ID making it unique.
This ID also tells the embedded add to cart html what price, SKU, and option information to use on the page where the snippet is added.
How do you find the "PRODUCT.ID" for a product?
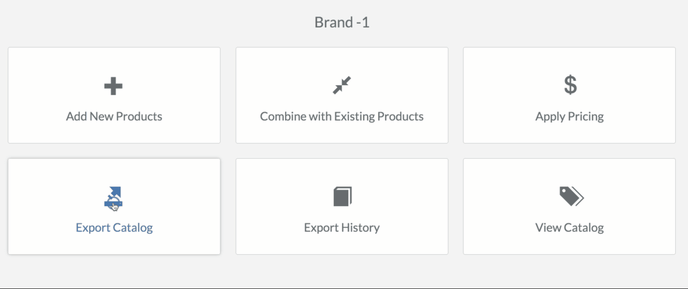
The Quivers product number for a specific product can be found by navigating to https://catalog-import.quivers.com/ and selecting "Export Catalog." The catalog will then take you to the "Export History" tab in the catalog export tool.
Once the catalog export is ready, a link will appear that will start a spreadsheet download. The first column in the spreadsheet (column A) is the Quivers product ID.
Once the HoverCart code has been added to the header of the site, the add to cart code (<div data-widget="PRODUCT.ID"></div>) filled out with a product ID from column A of your Quivers product catalog export will produce the add to cart ability for a product.
Here is an example populated add to cart button HTML code: <div data-widget="928342"></div>
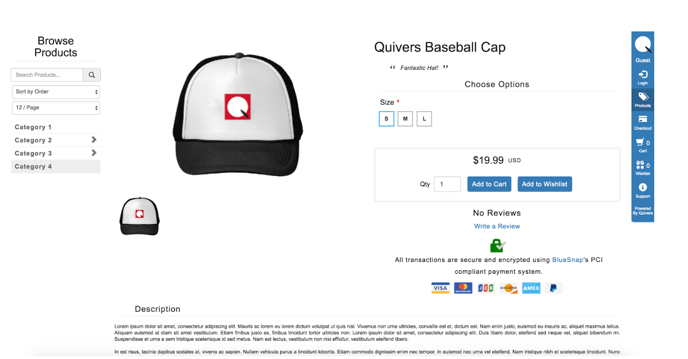
When added to a website, the raw add to cart will look similar to the below screenshot. The default add to cart comes with product name, any product options, prices, quantity controls, add to cart, and add to wishlist (if wishlist is enabled). All these elements can be customized and removed through CSS.
The same add to cart html can be added to multiple locations on a website. Anywhere you want the product to be purchased, the add to cart HTML can be added.
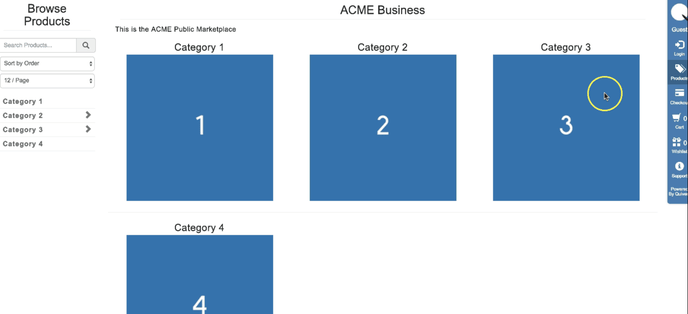
Embedded Store
The embedded store configuration of the HoverCart is a more comprehensive version of a store. With one line of javascript from the Storefront, this type of configuration includes a category menu, the grid page of products/categories, and a full product details page (2 templated styles).

This setup is great for businesses who do not have current individual product pages in their content management solution, or would prefer to manage the shopping experience (categories and products) from one location.
Since the javascript is one line, the store can be embedded on a single page of your website. Depending on your CMS, you can either add this code to a page of your website, or the header section of your site.
Once the HoverCart code has been added to the page to display the store, the content will need to be embedded into a div id on the page. This div id below can be added to the content section of the page.
<div id="quivers-store"></div>
Once this is added to the page, the HoverCart can reference the div id to display the content within that div location. To access the HoverCart settings to add the div id for the HoverCart to, reference the screencast below.
1. To login to the HoverCart, the user needs to be added as an admin to the business on the Quivers admin panel first.
2. Login to the HoverCart ribbon in the preview of the admin panel, or on the page where the HoverCart code has been added.
3. The email address and password used to login to the HoverCart will be the email address and password used to login to the Quivers Admin Panel.