This installation guide will walk you through the steps necessary to implement the demo core app that integrates your Quivers account with BigCommerce. Please reach out to support@quivers.com if you need assistance with setting up your base integration with BigCommerce.
In your BigCommerce store, complete the following:
-
Install the Quivers Demo App: https://apps.bigcommerce.com/details/50160
-
Click on the checkbox to confirm the usage terms and conditions. Click on Confirm.

-
Once the app is installed, you'll see an "App Installed" notification. Simply click on "Click here to set up your BigCommerce store with Quivers."

-
A processing page will be displayed. Please wait while the processing completes. Once finished, you'll be redirected to the BigCommerce app section.
-
Select Quivers Demo App and click on Launch.

-
Upon reaching the Quivers Pay settings, if you wish to make any adjustments, simply click on the link labeled "click here to configure settings." This action will redirect you to the Quivers admin panel app, where your BigCommerce store was previously mapped or configured.

-
Here you will find 6 settings tabs to update/save which are mentioned below. To begin, click on "Start app" under the actions column
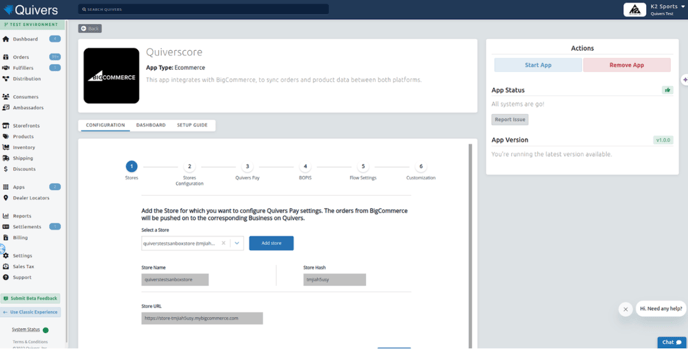
Guide to Quivers Admin Panel App Configuration:
-
Stores: It contains storefront details like store name, Storehash, and URL. If multiple stores are configured via Quivers admin panel from the same brand, you will see all stores' names in the "select a store drop-down ". By Selecting a store from this drop-down you will see the corresponding details of that store. It contains + icon, by clicking on this icon you can configure additional stores.

-
Stores Configuration: Here, you can select storefronts, and warehouses are automatically shown for the store. Assign an order prefix for the respective store.

-
Quivers Pay: It contains Quivers pay settings i.e. Stripe and Debug Mode. Choose a store from the dropdown menu and adjust the settings accordingly. Make sure to enable the Stripe payment methods as needed.

-
BOPIS: It allows you to activate/deactivate BOPIS for selected stores. Select your store and click on the activate/deactivate button. (Ignore this BOPIS section as a work in progress)

-
Flow settings: It contains all order flow settings. Default settings are already enabled.

-
Customization: Customization allows you to tailor the integration to your specific needs and requirements. You can disable it anytime.

After the configuration of these settings, the store will be ready to use the Quivers payment gateway and its other features.
To Place an Order:
Step 1: Add a product to the Cart by visiting the store.
Step 2: Click on the "Proceed To Checkout" button.
Step 3: Fill all the necessary customer details like email, shipping, and billing address
Step 4: On the checkout page you will find Quivers Payment methods. Only those payment methods will be displayed on the checkout page which was "Enabled" while updating and saving the settings tab on Quivers. If you have additional Payment Methods other than Quivers Payment Methods, then they will also be displayed on the checkout page.
Test Payment Details:
When using the sandbox/demo version of the app, the following details can be used to place an order using fake test payment details:
-
-
Fill in all the card details and click on the place order button.
-
Select the bank tab in place of the card tab when you choose payment with a stripe link.
- Choose a bank
- Add an Email
- Add OTP "111111"
- Choose Account
- Connect account
- Place order
-
Once your order is complete, visit the Quivers Panel → click on the order and the order details will be displayed within 3 to 5 minutes.