Retail Pro Inventory
About Retail Pro Inventory:
Enabling this App will allow you to import your inventory positions into Quivers from your Retail Pro POS.
How it works:

To use this App, you'll need the following:
- An active subscription of Retail Pro v8 or Retail Pro v9
- An installed and activated Retail Pro application on your system.
- Inventory: On Hand Summary report exported in XLS or CSV Format.
To sync your inventory into Quivers, you will create an export from Retail Pro POS which can be sent into Quivers via Dropbox, Email or FTP. Quivers will process this report and your inventory positions will be updated in your Quivers Account.
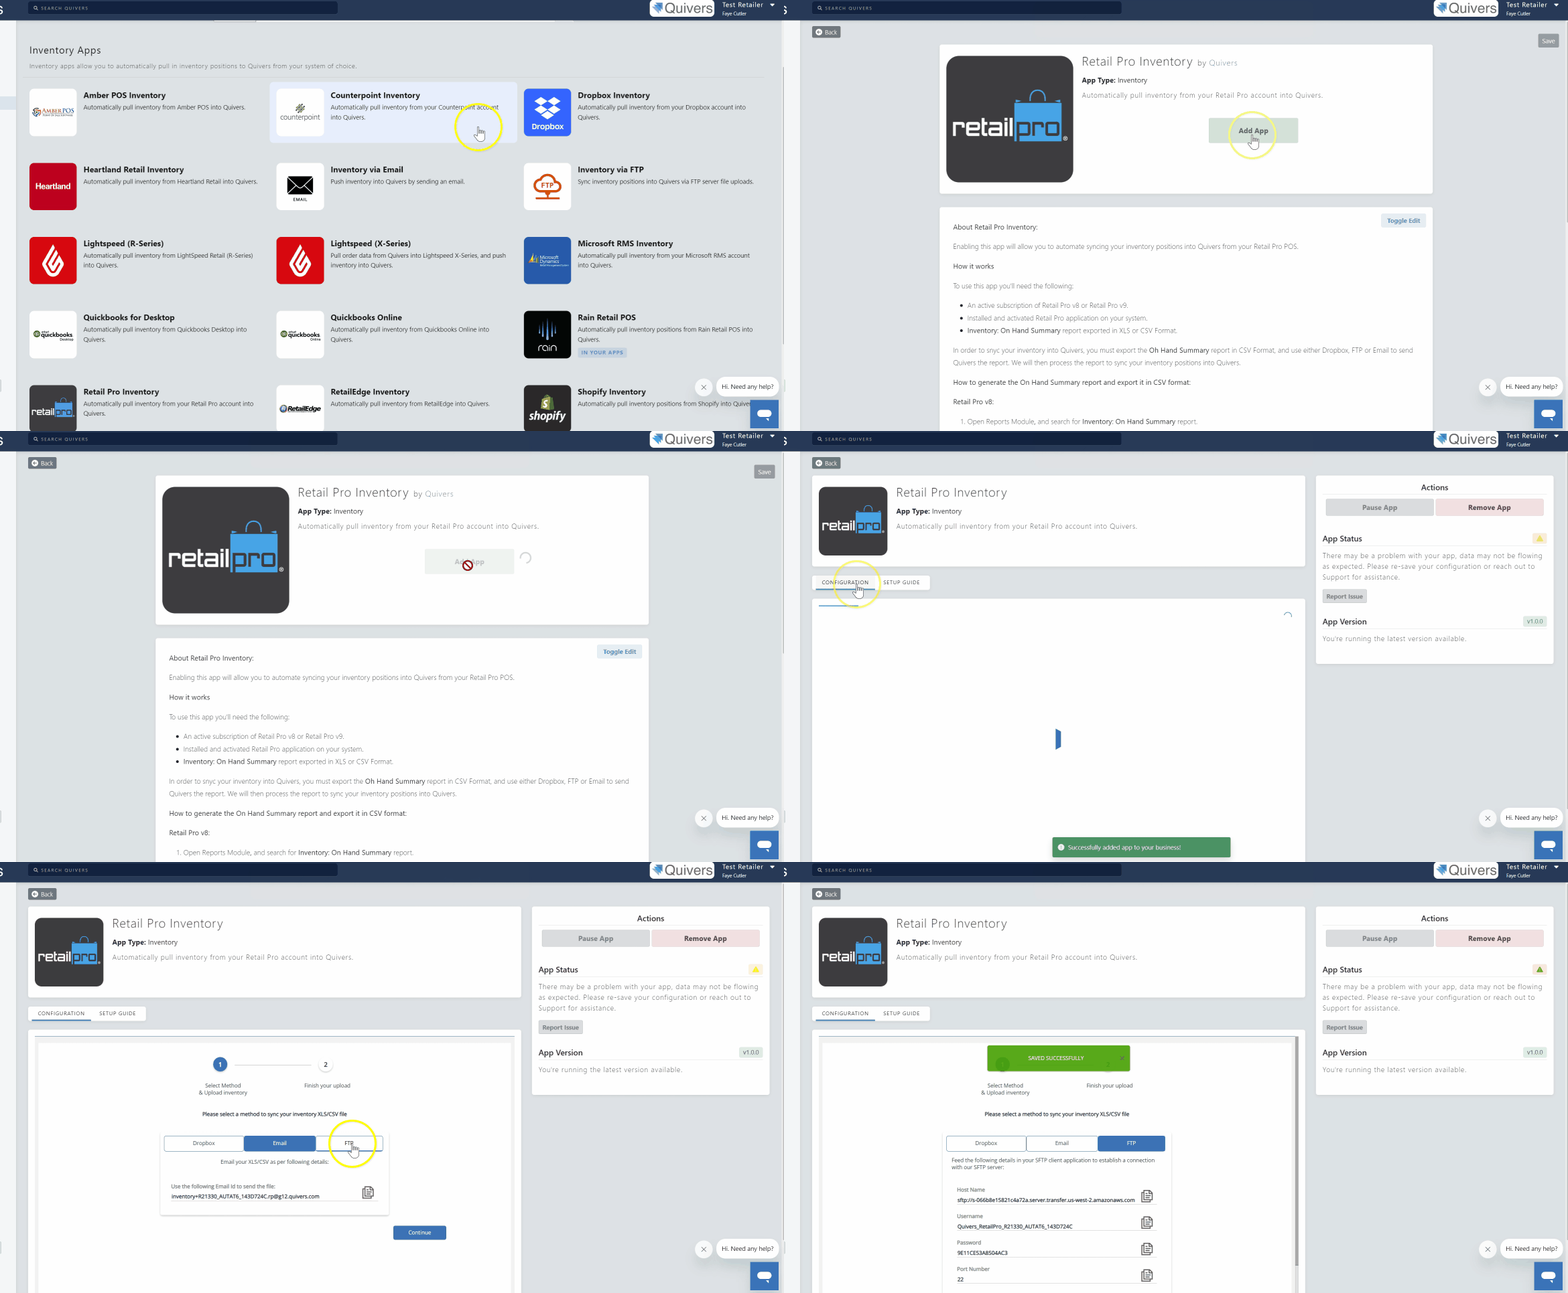
Step 1: Add the Retail Pro Inventory App to your Quivers Account:
- Open the Quivers Retailer Panel, and go to the “Apps” on the left hand rail.
- Click on “App Marketplace” to view the list of Apps available, and locate Retail Pro Inventory.
- Select “Add App” to install this app to your Quivers Account.
Step 2: Generate the On Hand Summary report in Retail Pro:
Instructions for Retail Pro v8:
- Open the Reports Module.
- Search for the "Inventory: On Hand Summary" report.
- Make sure the report includes the UPC and Qty columns. If they're missing, follow these steps to add them.
- Select the "Inventory: On Hand Summary" report from the list.
- Click on the "Edit" button in the header menu to modify the report.
- The Edit Report screen will appear. In the lower half of the screen, find the missing column's name in the table and double-click on it to add it to the report.
- Click the "Save" button in the header to save the changes.
- Close all settings.
- Double-click on the "Inventory: On Hand Summary" report in the Reports Module to run it. The report will appear on the screen in Retail Pro's default format.
- In the report, look for the Export dropdown option in the header menu.
- Click the Export dropdown to see all export options.
- Select either "Send to Excel" or "Send to Excel (as text)" option.
- The report will immediately open in Excel format if you have Office software installed. Save this Excel report to your local system.
- Open the report in Excel and then save it in "CSV" format. If you use Dropbox to sync inventory to Quivers, you can save the file directly to the shared Dropbox folder to sync the inventory positions in this report.
Note: If you have multiple locations, then from the Edit Report screen, click on the Edit Filter option on the right side menu, select each location one by one and generate a different report for each location.
Instructions for Retail Pro v9:
- Open the Reports Viewer.
- On the left side tree menu, select "Summary" and search for the "Inventory: On-hand Summary" report.
- Make sure the report includes the UPC and Qty columns. If they're missing, follow these steps to add them.
- Double-click the report name in the left side tree menu to open the Edit Report Panel.
- In the Edit Report Panel, find "UPC" under the PARAM NAME column.
- In the TYPE column, select "Numeric Range" as the data type for UPC.
- In the LOOKUP NAME column, select "UPC" and click Save.
- Follow the same procedure for the "Qty" PARAM NAME. Select "Numeric Range" as the data type and "Quantity" as the LOOKUP NAME. Click Save.
- Close the Edit Report Panel.
- Again, select the "Inventory: On-hand Summary" report from the Report Viewer.
- Click the Run button on the right side menu.
- The report will appear on the screen in Retail Pro's default format.
- To export the report to Excel, look for the Export dropdown option in the header menu when the "Inventory: On-hand Summary" report is displayed.
- Click on the Export dropdown to see all export options.
- Select either "Send to Excel" or "Send to Excel (as text)" option.
- The report will immediately open in Excel format if you have Office software installed. Save this Excel report to your local system.
- Open the report in Excel and then save it in "CSV" format. If you are using Dropbox to sync inventory to Quivers, you can save the file directly to the shared Dropbox folder to sync the inventory positions in this report.
Step 3: Import into Quivers
- Open your Retail Pro Inventory App in the Quivers Admin Panel, and open the “Configuration” tab.
- Select the method you wish to use to import your inventory and follow the relevant instructions:
- Dropbox - add your Dropbox ID and a folder will be shared with you
- Email - Email your CSV to the email address specified
- FTP - Add the details to your SFTP client application to connect with our SFTP server.
FAQs
What is a CSV file?
- CSV is a file format that stands for "comma-separated values"; you can create a CSV file by saving an Excel workbook file as the CSV file format, by downloading a Google Sheet as a CSV format, or if you are performing an export out of your Inventory Management System, it may already get saved in that format.
Do I need to format or remove any data from my “Inventory: On-hand Summary report”?
- No, provided you have followed the steps above, the app will recognise the default format of the report, editing the formatting or data once you have exported the report from Retail Pro may cause issues with import.
How do I know if my import was successful?
- Within the App you will find the Import Logs, these will help you track the success of your imports.