Our built-in onboarding checklist helps you ensure your business setup is fully complete.
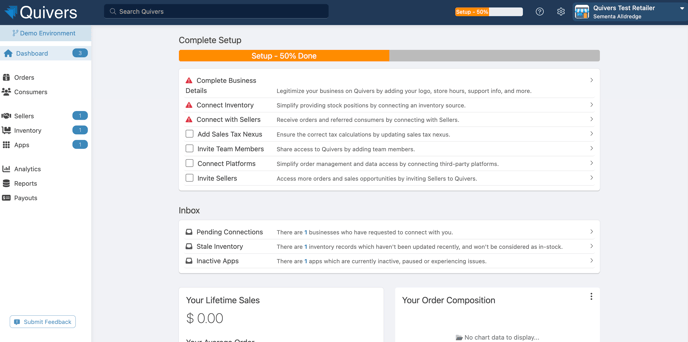
Each step will take you to the relevant area of the Retailer Panel that needs attention. As you complete each item, your checklist will be updated.
These steps are not mandatory, but they will help to optimize your Quivers experience.
1. Business Details
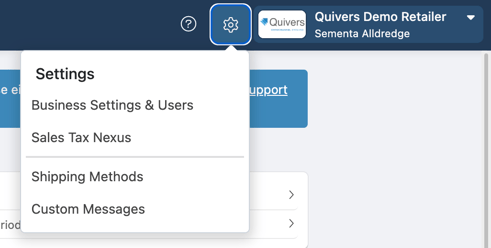
This will take you to the "Settings" tab where you can update all the essential information about your business. The information provided in this view will be used for consumer notifications.
The key areas to update are:
- Your company logo - this needs to be at least 600px wide.
- Your store hours - hours of your business.
- Your Business Details - including legal name, industry, website, your contact information including email/phone numbers for customer support.
From this screen, you can also add in any Shipping Methods that you use to fulfill your orders. Select "Shipping Methods" and enable any carriers you use from our list. If you’d like to add one that isn’t listed, simply select "ADD". These options will be made available to you choose from when you are shipping an order.
The Custom Messages Tab allows you to enter a custom message to be included on your packing slips. Once you have made your updates, don’t forget to click "Save".
Looking for more information? Check out our articles on Settings.
2. Add Inventory to Quivers
This step will take you to the Inventory section of the Admin Panel. Here you can upload and manage the inventory you have available for orders placed through Quivers.
Keeping your inventory up to date in Quivers means orders can be automatically assigned to you as they are placed on the brand's website. This ensures you are ready to fulfill inbound orders, raising customer satisfaction, enhancing brand loyalty and encouraging repeat purchases. Some brands may have Inventory Age Thresholds, meaning that only inventory that has been updated in a specified time frame will be considered, if you aren’t sure what your brands’ settings are then please reach out and we can help.
In addition, you can enable Auto-Claim to have Quivers claim orders on your behalf, ensuring you do not miss any selling opportunities while you are away from your store or busy on the floor with customers!
We have multiple ways to make inventory management easy for you in Quivers:
- Manually in the Admin Panel
- Inventory by CSV
- Utilizing one of our Inventory Apps to either link with your existing POS system, or by email, Dropbox, or FTP.
If you decide not to upload your inventory, you can still claim orders, however, depending on your Brand’s routing settings this may impact your order volume so we would highly encourage you to complete this step!
3. Connect with Sellers
The "Sellers" tab is where you can find the full list of sellers available for you to connect with on Quivers.
Once you have connected with a Seller you will be able to start fulfilling orders on their behalf.
Here you can also manage your connections and view any incoming connection requests. After you’ve requested to connect with a Seller, they will need to approve that on their end.
You can also invite new sellers to join the Quivers network using the "Invite" button. This button’s intention is to invite businesses who are not currently on the Quivers platform.
Check out our full guide on how to connect with Sellers.
4. Manage Sales Tax Nexus
Quivers will calculate sales tax based on the state and county of the consumer’s shipping address and your specific sales tax settings in Quivers. You can find this by navigating to the Settings > Sales Tax Nexus
The Sales Tax section allows you to specify which economic Nexuses your business needs to collect and remit taxes. Sales Tax Nexus should be configured within the Quivers Retailer Panel to ensure tax is collected on orders for which you must remit Sales Tax. While Quivers is collecting taxes on your behalf, it is still the responsibility of the Retailer to report these taxes.
The amount of tax charged for an order will be displayed on the order details screen. Our guide on Sales Tax walks you through the process of adding your economic nexuses.
5. Invite Team Members
You can add as many additional team members to your Quivers account as you need. New users can be added at any time via Settings > Business Settings & Users in the top right corner.
There are four roles to choose from:
- Admin - A user with an admin role will have visibility and editing ability to all areas of your Quivers account. These users can claim orders, change business settings, update products, and marketplace configurations, download and review reports, and also update and manage shipping and warehouse settings.
- Basic - A user with a basic role will only have access and visibility into the Orders tab on Quivers, and the Reporting tab on Quivers. They will not have access or visibility into any other features on Quivers. Most commonly this is the role used for the accounting resource.
- View Only - A user with view only will be able to see everything within Quivers, but will not be able to make any changes.
- Employee - This user will be unable to make changes to the business. This role is utilized as a relationship role for Retailers and can directly correlate with a Brand’s ARM Program.
Once you have added your team members details they will be sent an email invitation to join Quivers. Each user is able to configure custom notification preferences. Read our step-by-step guide to adding users.
6. Add Apps
This step will direct you to Quivers’ own App Marketplace where you can find Apps to install to your account.
Our Quivers Inventory Apps allow you to seamlessly pull in inventory positions from your system of choice - your existing POS system, or use our options for Inventory by Dropbox, Email, or FTP.
Simply find the app you want to install, choose "Add App", and then follow the configuration instructions to install. The "My Apps" section allows you to manage your installed apps.
Find out more in our article Inventory Apps.
Now you have completed your Onboarding checklist your account is ready to go! For assistance at any time, please reach out to support@quivers.com
Next → Learn about Paylution