
The Quivers Order Details Panel is where orders are processed in Quivers. Everything from claiming an order, shipping, returning, canceling and sending to Fulfillers occurs in the Order Details Panel.
Let's take a look at how it all works:
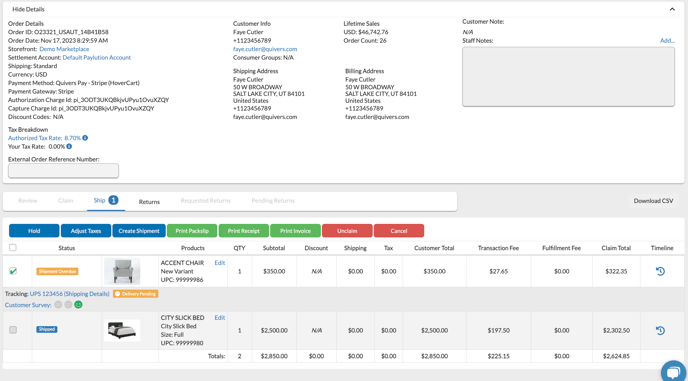
This view of an order includes all the information necessary to process an order from claim to ship.

Order ID: The order number provided to consumers. This ID can be used to search through the panel for the order.
Order Date: This is the date and time the order is placed. The time will match the users time zone and converts to ensure the time is accurate.
Storefront: This is the storefront where the items were purchased.
Settlement Account: The settlement account that the order will be paid or charged to.
Shipping: The shipping the consumer selected will display within the order details. The date of when the order has been guaranteed to ship by will be next to the selection of either "Standard" or "Expedited." If Expedited has been selected by the consumer, the order may need to be processed faster than normal.
Currency: The currency of the order
Payment Method: How the customer paid (external payment gate way OR Quivers Pay)
Discount Codes: If a discount code was used, it would display here

Customer Info: Includes the customers Name, Phone Number, and Email Address.
Consumer Groups: Any consumer groups they're associated.
Lifetime Sales: This will show their $ amount in the currency they've purchased in as well as the total number of orders they've placed.
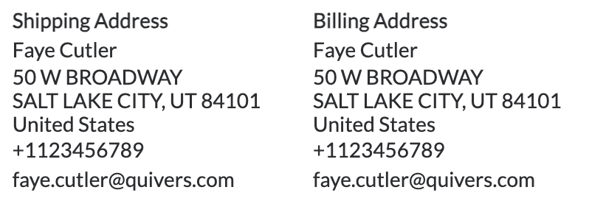
Shipping Address: This is the location where the item(s) will need to be shipped. This information will be automatically included when you go to create a shipment and can be edited if necessary. It also includes the contact information for the consumer.
Billing Address: The billing address is related to the consumer who placed the order, and is connected to the payment method that was used. This information may not match the consumer shipping address information.
Customer Note: At checkout, consumers can add notes to their order including special instructions or other requests. It is important to check this section to see if these exist on an order.
Staff Notes: Within the order, staff members can add notes to share within your business panel. These notes will not be visible to anyone else besides the users in the business panel where you are viewing the order.

Order Status Tabs: The order tabs at the top of the order screen will indicate what status each item is in and how many items are within that status. Some items may be in different stages of processing than others. If the tab is highlighted, that is the tab you're currently working in. If the tab is grey, you are not working in that tab.
As the order is processed from the Order Details Panel, it will go through various steps.
When an order is under "Review" the items will not be able to be processed. Review is the status when the fraud review process needs to take a further look into an order before validating if it can be processed. If an order is rejected by our fraud review process, the order can still be processed by overriding the decision and taking on the fraud risk to process an order.
Once an order is rejected by the fraud review process, the order will display as "Fraud Detected" in the Quivers Order Overview Panel. This means that the business has the opportunity to override the status, take on the fraud liability, and process the order. If Quivers receives a chargeback for that order and the status has been overridden, the business will not receive the funds for the order. Let's take a look at how to override an order which has been rejected for fraud suspicion.
Allow Rejection: An order which has been rejected can stay rejected, and ultimately be cancelled by selecting the "Allow Rejection" button. If the allow rejection button is selected, the decline decision will process and the order will be cancelled.
To override the order decline decision made by Signifyd, the "Ignore Rejection" button will allow a business to accept the fraud liability and process the order. When the Ignore Rejection button is selected, an important message will display to the business to accept the liability. If "Ignore Rejection" is selected, and a chargeback is received for the order, the business will be subject to funds being collected to cover the chargeback.
Maintain Rejection: will keep the order in a fraud decline process until the override timer runs out. Once the override timer is up, the order will be cancelled and the consumer will be notified that the order was not able to be processed.
Cancel: Item(s) can be cancelled during the fraud review process. To cancel an item or items, use the checkboxes on the left to select which items should be cancelled and select the Cancel button. A pop up message will ask you to confirm that you would like to cancel the items. The consumer will then be notified of the cancelled items.
Claiming an Order: Claiming an order is the first step in the order fulfillment process. When first entering the Order Details Panel, all the items within the order will automatically be selected. To confirm the items that you want to claim, you can uncheck any items you do not want to claim, and then select the "Claim" button within the Claim tab. If the items are not in the Claim tab, the order is no longer available to be claimed.
Claim: Selecting the Claim button will confirm that you want to claim the checked items and will move them to next tab of fulfillment, "Ship".
Resend: will allow a Merchant to send the order to the full order network. The order will not go through the Fulfiller timers, but rather be available to all Fulfillers again who are able to fulfill the order.
Send to Fulfiller: A Merchant can send an item or items to a specific Fulfiller of their choosing. When this button is selected, a pop up will ask you to type in the name of the Fulfiller you want to send the item(s) to and for how long. That Fulfiller will then have exclusive access to the item(s).
Cancel: To cancel an item or items, use the checkboxes on the left to select which items should be cancelled and select the cancel button. A pop-up message will ask you to confirm that you would like to cancel the items. The consumer will then be notified of the cancelled items.
Shipping an order: Once an item or items have been claimed, a carrier and tracking information can be added to complete the order in the Quivers Admin Panel. Once an item is marked shipped, the order will allocate to the business who fulfilled it and they will be paid for that order on the next settlement period. Shipping an order also sends a notification to the consumer of the items shipped and will include the tracking information.
Create Shipment: To begin the shipment process, select which items will be included in the shipment. Items can be shipped in multiple shipments, and a consumer will only receive notifications and tracking details for items that are completely shipped in Quivers.
Creating a shipment for items is very similar to claiming items. Simply uncheck any items which should not be included in the shipment, and select the "Create Shipment" button. A pop-up message will request the carrier and tracking information for the shipment. These details can be updated with the "Edit Tracking" button if needed.
There may be items displayed which are grey which means they are not available to mark as shipped. Their checkboxes will not be available to select in the ship tab.
Edit Tracking: If a tracking number for item(s) needs to be updated before the item(s) are marked shipped and therefore can not be updated, the Edit Tracking button can be selected to modify the shipment details for the items. The consumer will not receive a shipping notification until the "Ship" button is selected.
Ship: Once the item(s) are ready to be completed in the Order Details Panel, the ship button can be selected to trigger the notification to the consumer and also complete the order in the system. *Items can NOT be changed once marked as shipped.
Print Packslip: The Print Packslip button can be selected at any point of the shipment process and will generate a pack slip which can be included in the package sent to the consumer for order reference. The consumer will also receive a shipping notification via email with the same information.
Unclaim: Unclaiming an item returns the item back to an "Available" status. An item must be unclaimed to be cancelled or to be offered to Fulfillers again after being claimed. To unclaim the item(s), unselect the checkboxes next to the items which should not be unclaimed and select the "Unclaim" button.
Cancel: To cancel an item or items, use the checkboxes on the left to select which items should be cancelled and select the cancel button. A pop-up message will ask you to confirm that you would like to cancel the items. The consumer will then be notified of the cancelled items.
Returns can occur in two different ways:
1. A consumer can request a return by accessing their My Account and requesting a return. When this occurs, the Admins of the business who have the "New Refund Request" notification selected in their user profiles will be notified. Consumers who request returns will not immediately receive instructions on how to return products as businesses need to first approve the request to return.
2. A consumer can contact the fulfilling business directly to create a return. When a return is created in the Quivers Order Details Panel, a return does not need to be approved for the consumer to receive return instructions.
If a customer has created the return from their "My Account", the items which have been selected for return will display the status label of.
If that is the case, the request to return has already been created and the "Approve Request" button should be utilized instead of the steps below.
Once the item(s) have been selected, confirm creating the return by selecting the "Create Return" button. A pop-up window will open with the selected return items to check if the consumer should have the product price returned, or the product price including shipping.
Let's take a look at the refund options:
Refund Product with Shipping Included - This will return the total cost of the product plus the shipping that was paid for that product.
Refund Product with Shipping NOT Included - This will return the total cost of the item but the originally paid shipping costs will not be returned to the consumer.
Custom Refund Amount - This will activate the "Refund Total" box so the business can enter the total amount to return the consumer.
Confirm the return by selecting the "Create Return" button at the bottom of the pop-up.
Approve Request button will only be active if the consumer requested the return from their My Account. Selecting approve request will send the consumer instructions on how to return their product to your business address location.
Deny Request button will only be active if the consumer requested the return from their My Account. Selecting deny request will send the consumer an email that their return is not able to proceed.
Refund Customer: Once the return has been created, the refund customer button will be active. Once the items are received back, the refund customer button will trigger Quivers to refund the consumer for their return. *Do not select the refund customer button until the return has been received from the customer.
The timeline for each item will display actions and fulfiller visibility for each item.
To view the timeline for a particular item, select the timeline icon in the timeline column. A pop-up window will display the various actions that have occurred for that item.
The timeline will include information about when Fulfillers were notified and what Fulfillers were notified about the item, claiming and the user who claimed the item, when an item was shipped, and return information if an item is returned. The timeline will display who created the return (consumer or fulfiller) and when. The timeline feature also includes detailed information about when returns were full processed.