This article explains how Sellers can manage returns, refunds (including refunds without returns), and exchanges in Quivers.
Table of Contents
Returns
How a Return is Initiated
Returns on Quivers can be initiated in two ways, depending on your storefront setup:
-
Customer-Initiated via Their Account (HoverCart Users Only)
If your store uses HoverCart, customers can request a return through their “My Account” page.Note: This option is available only to Sellers using HoverCart.
The return request does not automatically send return instructions — the Seller must first review and approve it. -
Seller-Created from the Order Panel
Sellers can initiate a return directly within the Order Details panel in Quivers.
Returns created this way skip the approval step, and the customer receives return instructions immediately.
Steps to Process a Return
1. Select Items for Return
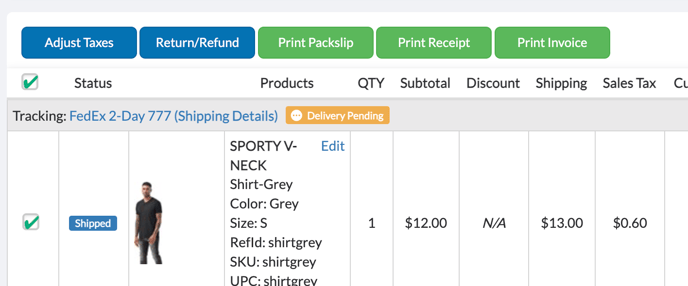
In the order details view, check the box next to the item(s) the customer is returning.
2. Determine Next Action
-
If the item is already marked “Return Request” (from a customer-initiated return), click the Approve Request button to send the return instructions.
-
Otherwise, proceed with creating a new return.
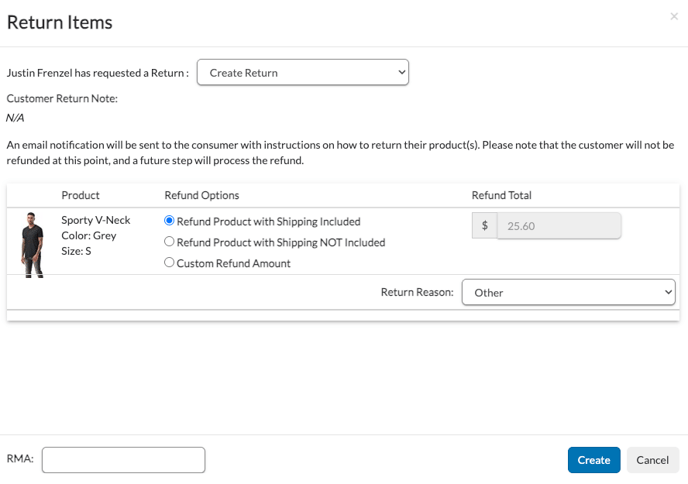
3. Click “Return / Refund”
A popup will open showing the items selected for return and three refund options:
-
Refund Product with Shipping Included — return the product cost plus its original shipping fees
-
Refund Product with Shipping NOT Included — refund only the item cost
-
Custom Refund Amount — open a field allowing a custom refund total
Before creating the return:
-
Choose a Return Reason from the dropdown menu (e.g., “Defective Item,” “Wrong Product Shipped,” etc.)
-
Optionally, enter an RMA number for tracking or internal reference
Once you’ve entered the details and selected the appropriate refund option, click “Create Return.”
4. Approve or Deny (If Customer Requested from Their Account)
-
Approve Request sends the customer instructions for returning the product
-
Deny Request sends a refusal email
These buttons are only active when the return originated from the customer’s account.
5. Receive & Confirm Return
Once the returned item arrives, click “Refund Customer.”
Important: Don’t finalize the refund until you’ve physically received the product.
After the refund has been processed, it may take 5–10 business days for the funds to appear in the customer’s account, depending on their payment provider.
Resend Return Instructions
If a return has already been approved but the customer has not received their instructions:
-
Open the order containing the “Return Request” label.
-
Go to the Pending Returns tab.
-
Check the box next to the item marked “Return Approved.”
-
Click the “Resend Instructions” button to resend the return instructions to the customer.
Note: This option is only available for approved return requests.
Refund Without Return
In some cases, a refund may need to be issued without requiring the customer to return the product. This option is typically used for:
-
Product defects — when the item is damaged or unusable, and a return shipment isn’t necessary
-
Customer credits or goodwill gestures — offering partial or full refunds as compensation
-
Unshipped products — when a product was charged but never shipped
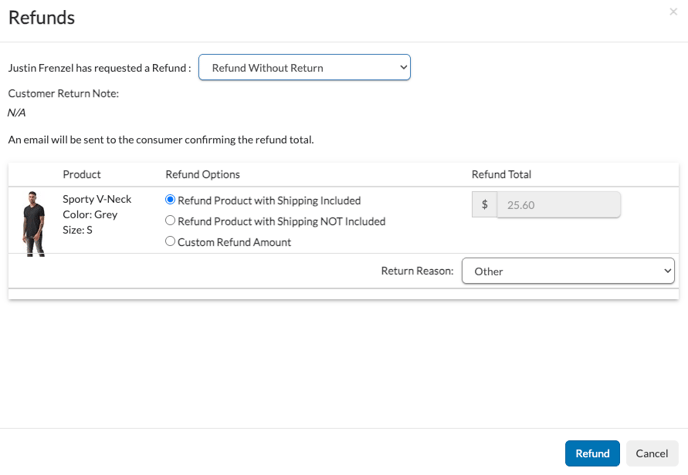
How to Process a Refund Without Return
-
Open the Order Details page.
-
Select the product(s) to be refunded.
-
Click “Return / Refund.”
-
Choose a Return Reason from the dropdown menu (an RMA number is not required for this type of refund).
-
Select one of the available refund options:
-
Refund Product with Shipping Included — refund the product cost plus original shipping fees
-
Refund Product with Shipping NOT Included — refund only the product cost
-
Custom Refund Amount — enter a custom refund total
-
-
Click “Create Return.”
Because no product is being returned, the refund will be processed immediately without waiting for shipment confirmation.
Note: Once processed, refunds can take 5–10 business days to appear on the customer’s account, depending on their payment provider.
Tip: Add a brief internal note explaining the reason for the refund (e.g., product defect, goodwill credit, or item not shipped) to maintain accurate records.
Exchanges
Exchanges are available only for Sellers using HoverCart.
An exchange allows a Seller to replace an item instead of issuing a refund. The replacement item must be a similar product and be equal to or less than the original product’s price.
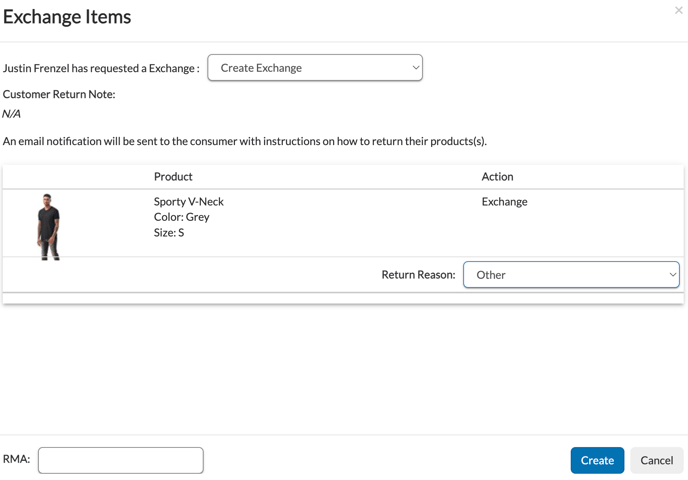
How to Create an Exchange
-
Open the Order Details panel and select the item(s) for exchange.
-
Click “Return / Refund.”
-
Select Return Type → Exchange.
-
Click “Create RMA” to generate the exchange request. The status will change to “Replace Approved.”
-
Ship the replacement product to the customer.