
In This Article
- Overview
- Before You Start
- Exporting Your Inventory from RetailEdge
- Installing the RetailEdge Inventory App
- Configuring the App
- Checking Your Upload Results
- Keeping Your Inventory Current
- Managing the App
- Frequently Asked Questions
Overview
The RetailEdge Inventory app lets Retailers who run RetailEdge POS sync their stock positions into Quivers. Rather than connecting directly to your POS, the app works from a CSV export: you export your inventory from RetailEdge, then send that file to Quivers using Dropbox, Email, or FTP. Quivers processes the file and updates your inventory positions automatically.
Keeping inventory current in Quivers is what allows orders to be routed to you as they're placed on a Seller / Brand's website — see Inventory in Quivers — Getting Started for why this matters.
Before You Start
To use this app, you'll need:
- The RetailEdge POS application installed and activated on your system.
- A way to send your file to Quivers: a Dropbox account, an email account, or an SFTP client application (such as FileZilla or WinSCP).
- An inventory CSV exported from RetailEdge that includes, at minimum, a UPC and a quantity on hand for each item.
|
Quivers Field |
What It Means |
Required? |
|
UPC |
The item's barcode (UPC). This is how Quivers matches your stock to a Seller's products. |
Yes |
|
Label |
The item's name or description. |
No |
|
Stock Level |
The quantity you currently have on hand to fulfill. |
Yes |
Note: Quivers matches inventory by UPC, so items without a UPC in RetailEdge won't sync. If an item isn't showing up in Quivers, check that it has a UPC in your POS first.
Exporting Your Inventory from RetailEdge
Before configuring the app, export your inventory from RetailEdge as a CSV. You'll use this file first as a sample for header mapping, and again every time you send Quivers an updated file.
Note: The Setup Guide tab inside the app lists an earlier version of these export steps. Follow the steps in this article instead — they reflect RetailEdge's current menus.
- In RetailEdge, go to Tools, then Export Data, then Inventory.
- Set your Filter Criteria (for example, active items or a specific location), or leave it blank to export all inventory. Click OK.
- Choose the Destination File Path and confirm the format is set to Comma Separated Value (.csv).
- Make sure the export includes the item's UPC and quantity on hand. You can include a description as well.
- Click Process / Export. The CSV is saved to the location you chose.
RetailEdge exports use its own column names. These are the ones you'll map in the app:
|
RetailEdge Column |
Contains |
Map To (Quivers) |
|
Inv_UPC1 (or Inv_UPC2) |
The item's UPC. RetailEdge has two UPC columns — use the one that holds your items' UPCs. |
UPC |
|
Inv_Quan |
Quantity on hand. |
Stock Level |
|
Inv_StockType |
The item's stock type — not a quantity. |
Do not map |
Best Practice: use the same export and the same fields every time. Quivers reads your file based on the header mapping you save during setup, so a file with different column headers won't import correctly.
Installing the RetailEdge Inventory App
- In the left menu of your Quivers Retailer Panel, click Apps.
- Find RetailEdge Inventory in the App Marketplace and open it.
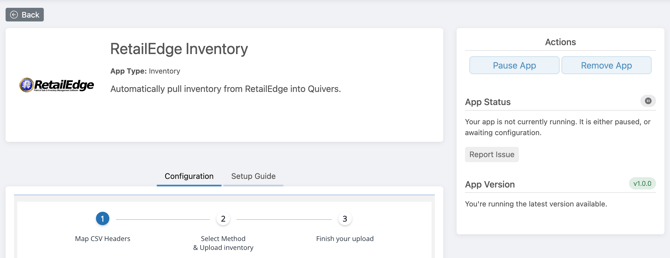
- Add the app to your business. The app page opens on the Configuration tab, with the three setup steps shown across the top.
Until setup is complete, App Status in the Actions panel reads that your app is not currently running because it is either paused or awaiting configuration. That's expected — it changes once you finish the steps below.
Configuring the App
Configuration happens in three steps, shown across the top of the Configuration tab: Map CSV Headers, Select Method & Upload inventory, and Finish your upload.
Map CSV Headers
Tell Quivers which columns in your RetailEdge file hold the UPC, label, and stock level.
- Click Upload and select your RetailEdge CSV export. A file with just the header row is enough. Need a reference? Click Click Here to download a sample CSV file.
- Under File Headers, select the column from your file that matches each field under Quivers Mapping. For a standard RetailEdge export, map Inv_UPC1 (or Inv_UPC2) to UPC and Inv_Quan to Stock Level. Map your description column to Label if you want item names included.
- Click Save to save your mapping.
- Click Continue.
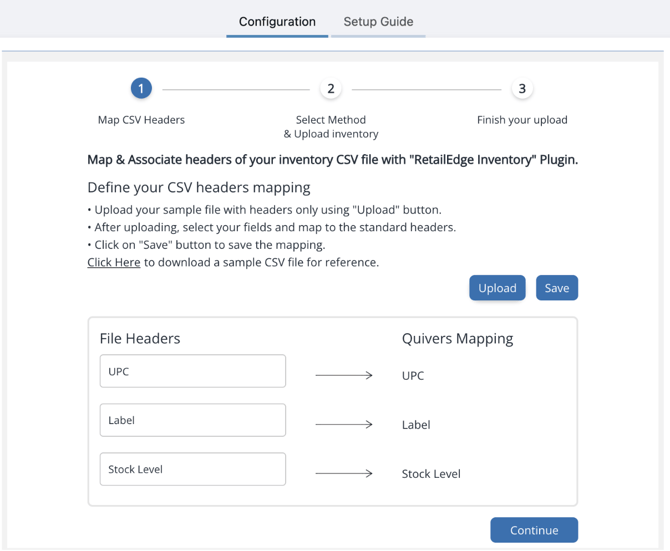
Step 1, Map CSV Headers — upload a sample file, match your File Headers to the Quivers Mapping fields, then Save
Note: headers aren't pre-mapped for RetailEdge, because its export includes more than one UPC column — you'll always map them yourself on this step. Double-check that Stock Level is mapped to Inv_Quan, not Inv_StockType; mapping the wrong column is the most common reason inventory doesn't sync.
Note: if you've saved a correct mapping but see "Please map both UPC and Stock Level." and Continue won't advance, click the 2 step indicator at the top of the Configuration tab to move to the next step. Your saved mapping is kept. This is a known issue our team is working on.
Select Method & Upload Inventory
Choose how you'll send your inventory file to Quivers. Select Dropbox, Email, or FTP, follow the instructions for that method below, then click Continue. You only need to set up one method.
|
Method |
Best For |
|
Dropbox |
Saving your RetailEdge export straight into a shared folder — no attachments or separate uploads. |
|
|
The simplest setup: email your CSV to your unique Quivers address whenever you export. |
|
FTP |
Retailers who already use an SFTP client or want to automate uploads. |
Dropbox
- Select Dropbox.
- In Email Id to share dropbox folder, enter the email address tied to your Dropbox account.
- Click Activate.
- Watch for a confirmation email once activation is complete, and follow its prompts to add the shared Quivers folder to your Dropbox.
- Save or move your RetailEdge CSV export into that shared folder.
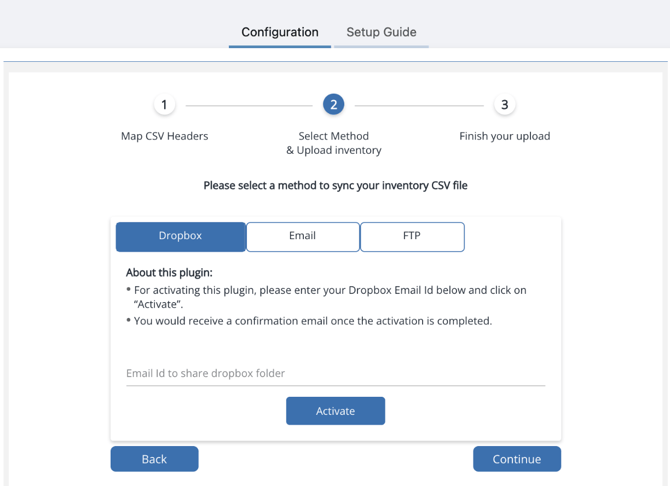
Dropbox method — enter your Dropbox email and click Activate
Once Dropbox is activated, this option shows sync timing settings in place of the email field. Choose how often Quivers checks your shared folder for new files.
Best Practice: set the sync to run no more often than once an hour. Syncing more frequently can cause files — especially large ones — not to import correctly.
Note: the Dropbox email can't be edited after activation. To switch to a different Dropbox account, remove the app (Remove App in the Actions panel), add it again, and activate Dropbox with the new email. You'll need to redo your header mapping.
- Select Email.
- Copy the address shown under Use the following Email Id to send the file using the copy icon.
- Email your RetailEdge CSV export to that address as an attachment, and confirm the email sent successfully from your mail client.
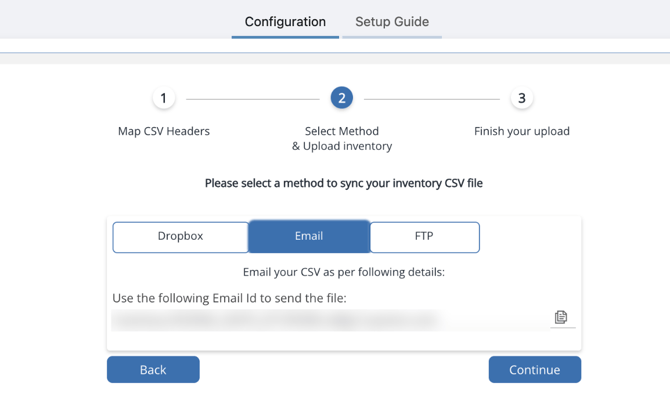
Email method — your unique inventory email address, with a copy icon (address blurred)
Note: your inventory email address is randomly generated and unique to your business. It stays the same after you send your first email, so you can save it as a contact and reuse it every time you send an updated file.
FTP
- Select FTP.
- Use the copy icons to copy the Host Name, Username, and Password into your SFTP client application to connect to the Quivers SFTP server.
- Once connected, upload your RetailEdge CSV export to the Remote SFTP server's folder.
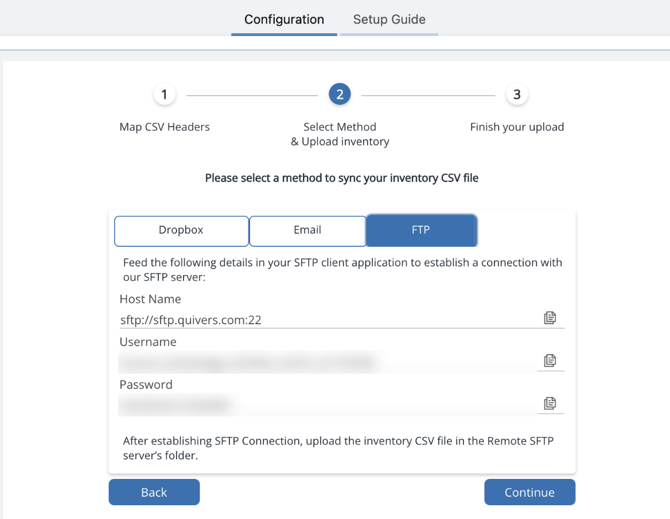
FTP method — Host Name, Username, and Password for your SFTP client (unique credentials blurred)
Note: enter all three values — including the Username — in your SFTP client. If the Username is left out, the connection will fail to authenticate. Your FTP Username and Password are unique to your business, so treat them like any other login and don't share them outside your team.
Finish Your Upload
- Click Finish Setup.
- Check the dashboard tab for upload progress and any errors on your file.
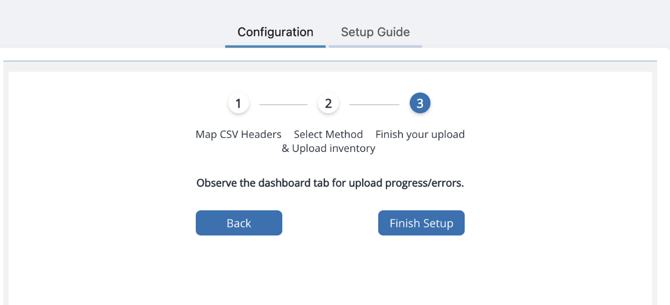
Step 3, Finish your upload — click Finish Setup, then watch the dashboard tab for progress and errors
Checking Your Upload Results
After you send a file, check the app's dashboard tab for upload progress. If your file or mapping has a problem, such as columns that don't match your saved mapping, you'll see an error like Invalid headers.
Note: files and rows that fail because of data errors appear only in the Import Logs section, not on the dashboard. Quivers doesn't attempt to sync those rows, so the dashboard won't count them as failed. If your dashboard shows no failures but some items didn't update, check Import Logs.
Keeping Your Inventory Current
After setup, Quivers processes each new file you send using the method you chose. To keep your stock positions accurate, repeat the RetailEdge export and send the updated file — drop it in Dropbox, email it, or upload it via FTP — on a regular schedule and whenever your stock changes significantly.
Best Practice: some Sellers use Auto-Assignment and require recently updated inventory to route orders to you. Sending fresh files regularly keeps you eligible. Once your inventory is syncing, consider turning on Auto-Claim so you don't miss orders — see Auto-Claim & Auto-Assignment.
Managing the App
The Actions panel on the right side of the app page lets you manage the app after setup:
|
Option |
What It Does |
|
Pause App |
Temporarily stops the app from processing inventory files. |
|
Remove App |
Removes the RetailEdge Inventory app from your business. |
|
App Status |
Shows whether the app is running, or whether it's paused or awaiting configuration. |
|
Report Issue |
Reports a problem with the app to Quivers. |
|
App Version |
Shows the version you're running and whether it's the latest available. |
Use the Back button at the top left of the app page to return to your Apps list.
Frequently Asked Questions
Do I need to connect RetailEdge directly to Quivers?
No. The app works from CSV exports: you export your inventory from RetailEdge and send the file to Quivers by Dropbox, Email, or FTP. There's no direct POS login or connection to set up.
Which fields does my file need?
At minimum, a UPC and a quantity on hand for each item. A description (mapped to Label) is optional. Items without a UPC won't sync, since Quivers matches inventory by UPC.
The steps in the app's Setup Guide tab don't match my RetailEdge screens. Which should I follow?
Follow the export steps in this article. The Setup Guide tab lists an earlier version of the process that doesn't match RetailEdge's current menus.
Which RetailEdge columns should I map?
Map Inv_UPC1 (or Inv_UPC2, whichever holds your UPCs) to UPC, and Inv_Quan to Stock Level. Don't map Inv_StockType to Stock Level — it holds the item's stock type, not a quantity.
Why aren't my RetailEdge headers mapped automatically?
RetailEdge exports include more than one UPC column, so Quivers can't choose one for you. You'll map your headers once in Step 1, and Quivers uses that saved mapping for every file after.
I mapped my headers and clicked Save, but Continue won't move past Step 1. What do I do?
If you see "Please map both UPC and Stock Level." even though your mapping is saved, click the 2 step indicator at the top of the Configuration tab to move on. This is a known issue, and your saved mapping is kept.
Which sync method should I choose — Dropbox, Email, or FTP?
Whichever fits your routine best. Email is the simplest to set up, Dropbox lets you save exports straight into a shared folder, and FTP suits Retailers who already use an SFTP client. You only need one.
Can I change the Dropbox account I use?
Not directly — the Dropbox email can't be edited after activation. Remove the app, add it again, and activate Dropbox with the new email. You'll need to redo your header mapping.
How often does Quivers check my Dropbox folder?
You choose. Once Dropbox is activated, the Dropbox option shows sync timing settings. We recommend no more often than once an hour.
My SFTP client won't connect. What should I check?
Make sure you've entered the Host Name, Username, and Password exactly as shown on the FTP option — a missing Username is the most common cause of a failed connection.
Will my inventory email address change?
No. It's randomly generated and unique to your business, and it stays the same after you send your first email, so you can reuse it every time.
I clicked Activate for Dropbox. What happens next?
You'll receive a confirmation email once activation is complete. Follow its prompts to add the shared Quivers folder to your Dropbox, then save your RetailEdge exports into that folder.
Where do I find my FTP login details?
On the FTP option in Step 2 of the Configuration tab. The Host Name, Username, and Password each have a copy icon so you can paste them into your SFTP client. The Username and Password are unique to your business.
How do I know if my file uploaded successfully?
Check the dashboard tab for upload progress and errors after you send a file.
My dashboard shows no failures, but some items didn't update. Why?
Files and rows with data errors appear only in the Import Logs section, not on the dashboard, because Quivers doesn't attempt to sync them. Check Import Logs for details.
I'm getting an "Invalid headers" error. What does that mean?
The column headers in the file you sent don't match your saved mapping. Make sure you're using the same RetailEdge export and fields each time, or update your mapping in Step 1.
Does my inventory update automatically after setup?
Quivers processes every file you send, but RetailEdge doesn't send files on its own — you'll need to repeat the export and send the updated file on a regular schedule to keep your stock current.
My App Status says the app isn't running. Is something wrong?
Not necessarily. That status appears when the app is paused or hasn't finished configuration. If you've completed all three steps and haven't paused it, use Report Issue or contact Support.
Can I stop syncing temporarily?
Yes. Click Pause App in the Actions panel. Keep in mind your last-synced inventory will go stale while the app is paused.
I operate more than one store. Do I set this up for each location?
Yes. Each location is its own business in Quivers with its own inventory, so install and configure the app separately for each one — see Additional Retail Locations.