
In This Article
Overview
Your Onboarding Wizard — found on your Retailer Panel Dashboard — walks you through the same checklist covered in this article. Each item links directly to the part of the panel that needs attention, and your checklist updates automatically as you complete steps.
Note: These steps aren't strictly mandatory, but two of them — Inventory and Seller Connections — are what actually determine whether you receive orders. The rest optimize your experience but won't block you.
Step 1: Complete Your Business Details
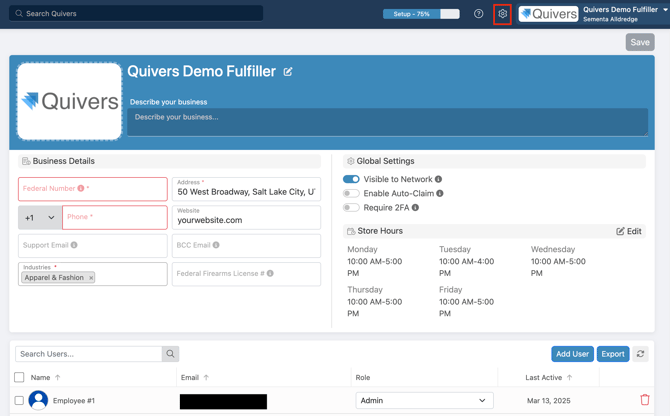
Click the Settings gear icon (top right) and select Business Settings & Users. This one screen covers your business profile, your global settings, your store hours, and your team — Step 5, below, happens here too.
- Company logo — click the logo tile to upload one (at least 600px wide)
- Federal Number, Address, and Phone — required
- Website, Support Email, and BCC Email — optional, used on customer-facing order communications
- Industries — required; this is also what Quivers uses to recommend Sellers for you to connect with (see Step 3)
- Federal Firearms License # — only shown/required if your business is in a regulated industry like firearms
Global Settings — on the same screen:
- Visible to Network — keep this on so brands can discover your business, including on their Dealer Locator and Find Local listings (see Three Ways to Work with a Brand in Quivers Overview)
- Enable Auto-Claim — turn this on once your inventory is synced (see Step 2)
- Require 2FA — requires two-factor authentication for everyone on your team
Also on this screen: click Edit next to Store Hours to set your weekly hours. These aren't just informational — they drive the Open/Closed status shown on any brand's Dealer Locator pin for your store, so keep them current.
Best Practice: Click Save at the top of the page after making changes — updates aren't applied until you do.
Two more settings live under the same gear icon but on their own screens: Shipping Methods (the methods you use to fulfill orders) and Custom Messages (a note included on your packing slips).
Step 2: Add Inventory to Quivers
Keeping your inventory current in Quivers is what allows orders to be automatically assigned to you as they're placed on a brand's website. You can manage inventory manually in the panel, via CSV upload, or by connecting one of our supported apps.
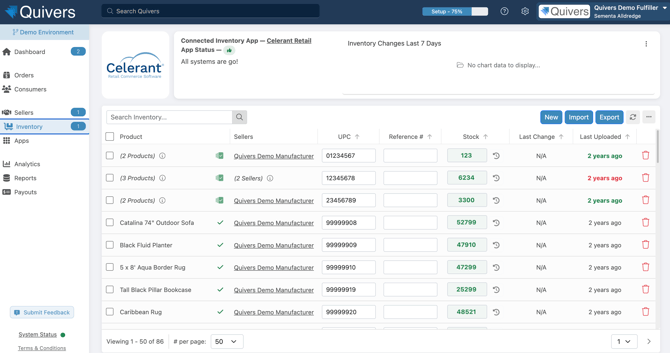
Pro Tip: Once your inventory is synced, turn on Auto-Claim in your business settings so Quivers claims eligible orders on your behalf — you won't miss a sale while you're busy on the floor or away from your desk. See Auto-Claim & Auto-Assignment for the full setup steps.
For the full walkthrough, see Inventory in Quivers — Getting Started and Auto-Claim & Auto-Assignment.
Step 3: Connect with Sellers
If you registered by claiming your business through a brand's invitation email, you're typically already connected with that brand — there's nothing further to do for them. Either way, use this step to confirm you're connected with every brand you want to work with: the Sellers tab shows the brands available for you to connect with on Quivers — Quivers recommends Sellers based on your stated industry, or you can search by business name or industry directly. Click the blue plus icon next to a Seller to send a connection request; if a brand you work with isn't listed yet, use Invite to send them a request to join Quivers.
- Available to Connect — Sellers you can request a connection with.
- Pending — a request has been sent and is awaiting the Seller's approval.
- Connected — the connection is active; the Seller sets the claiming policies that determine how their orders reach you.
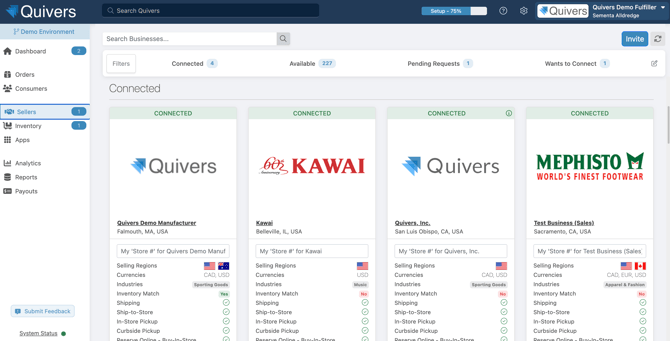
Note: You won't receive a brand's orders until this connection shows Connected, even if the rest of your setup is complete. If you're waiting on an invite or an approval, reach out to Support and we can help facilitate the introduction.
For the full how-to, see Connecting with Sellers.
Step 4: Manage Sales Tax Nexus
Quivers calculates sales tax based on the consumer's shipping address and your sales tax settings. In Settings > Sales Tax Nexus, specify which economic nexuses your business needs to collect and remit tax for.
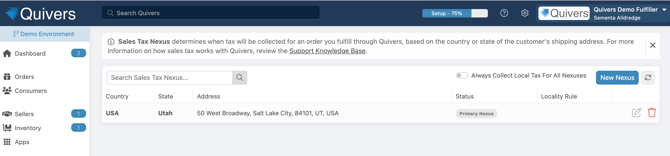
Note: While Quivers collects tax on your behalf at checkout, it remains the Retailer's responsibility to report and remit those taxes to the appropriate authorities.
For more detail on how tax is calculated by state, see our Managing Sales Tax Nexus in Quivers article.
Step 5: Invite Team Members
Back on the same Business Settings & Users screen from Step 1, scroll down to the Users table to add as many additional users as you need. Each new user receives an email invitation and can configure their own notification preferences. Choose the role that fits what each person should be able to do:
|
Role |
Access |
|---|---|
|
Admin |
Full visibility and editing across the panel — claim orders, modify business settings, install inventory apps, and onboard new users. |
|
Basic |
Can edit within Orders, Inventory, Reports, and Settlements. Cannot change business settings or install apps. Commonly used for accounting staff. |
|
View Only |
Can view all Quivers content but cannot make any changes. |
|
Employee |
Cannot make business changes. A relationship-scoped role used for certain brand ARM programs. |
For the full step-by-step (including the exact fields required for each new user), see Adding New Users.
Step 6: Add Apps (Optional)
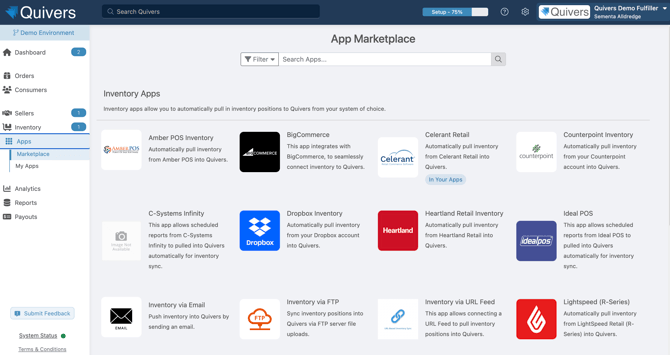
The App Marketplace offers apps for connecting your POS system, e-commerce platform, or file-based inventory feed (email, Dropbox, or FTP) directly to Quivers. This is the fastest way to keep inventory current without manual updates.
Frequently Asked Questions
Which step should I do first?
Business Details is a good starting point since it's quick, but Inventory and Seller Connections are the two that actually unlock orders — prioritize those if you're short on time.
What happens if I skip a step?
Nothing breaks, but skipping Inventory or Seller Connections means you won't receive orders. Skipping the others (logo, tax nexus, team members) just means a less complete experience.
I already have inventory connected — do I still need to send Seller connection requests?
Yes. Inventory sync and Seller connections are independent — you need both, since inventory just tells Quivers what you have, and the Seller connection is what makes their orders visible to you at all.
Can I revisit the checklist later if I don't finish it all at once?
Yes — your Onboarding Wizard on the Dashboard tracks your progress and picks up right where you left off.