
In This Article
- What Is Buy Online, Pick Up In-Store (BOPIS)?
- How to Enable BOPIS for Your Storefront
- The Customer Experience
- How BOPIS Orders Are Handled in Quivers
- Curbside Pickup
- BOPIS vs. Other Fulfillment Methods
- Troubleshooting: Why Aren’t Pickup Options Showing?
- Best Practices & Tips
- Frequently Asked Questions
What Is Buy Online, Pick Up In-Store (BOPIS)?
BOPIS (Buy Online, Pick Up In-Store) lets a customer buy a product on your website through the HoverCart, pay online at checkout, and collect the order from a nearby Retailer instead of having it shipped. The customer chooses the store from a list of nearby Retailers that can fulfill the item, and the order is assigned directly to that store.
BOPIS comes in two forms: In-Store Pickup, where the customer collects the order inside the store, and Curbside Pickup, where the customer waits in their car and the Retailer brings the order out. Inside Quivers you may also see In-Store Pickup referred to as ISPU.
This is different from ROPIS (Reserve Online, Buy In-Store), where the customer reserves the item without paying and completes the purchase at the store. See Reserve Online, Buy In-Store.
Note: This article covers BOPIS for HoverCart storefronts. In-Store Pickup is also available for some eCommerce plugins, and Curbside Pickup is HoverCart only. For plugin setup, see the articles in Plugins.
How It Works
- Paid online, collected locally — customers complete checkout on your site and pick up from a nearby store, with no shipping charge on pickup items.
- The customer chooses the store — the HoverCart shows nearby Retailers that can fulfill the item, with address, distance, contact details, and store hours.
- Assigned automatically — the order goes straight to the Retailer the customer picked, with no claiming window.
- Two pickup methods — offer In-Store Pickup, Curbside Pickup, or both.
Why It Matters
BOPIS turns online demand into local fulfillment. Customers get their order faster than shipping allows and skip shipping costs, while Retailers fulfill from stock they already have on the shelf. Because the customer comes to the store to collect their order, BOPIS also brings shoppers through your Retailers’ doors, where they can see the rest of what’s in stock. For brands, it strengthens Retailer relationships by sending them sales that start on your website, and it gives customers who want an item today a reason to buy from you instead of going elsewhere.
|
Term |
What It Means |
|---|---|
|
In-Store Pickup (BOPIS / ISPU) |
The customer pays online and collects the order inside the Retailer’s store. |
|
Curbside Pickup |
A type of In-Store Pickup. The customer pays online, parks outside, and the Retailer brings the order to their car. |
|
Retailer / Fulfiller |
The store that fulfills the pickup order. Fulfiller is Quivers’ platform term and appears throughout the Admin Panel (for example, the Fulfillers section and Maximum Fulfiller Inventory Age); this article uses Retailer for the same role. |
|
Claiming Policy |
The set of rules that determines which products, storefronts, fulfillment methods, and Retailers are eligible for routing. |
|
Auto-Assignment |
Order routing that assigns orders to Retailers automatically. Required for BOPIS. |
How to Enable BOPIS for Your Storefront
Complete the steps below in order. For a pickup option to appear on a product, every layer has to allow it: your storefront, your claiming policy, and the Retailer’s own fulfillment method settings for your brand. Reach out to support@quivers.com if you need help at any point.
Prerequisites
- An active HoverCart storefront. See Marketplaces and Storefronts.
- HoverCart implemented on your website. See Implementing the HoverCart on a Website.
- Product identifiers on every variant. Each product variant needs at least one identifier, such as a UPC, SKU, or GTIN. Quivers uses these to match your catalog to Retailer inventory, so a variant with no identifiers won’t show any Retailers.
- Connected Retailers with current inventory. Pickup options are driven by Retailer inventory. See Connecting/Disconnecting with Fulfillers.
Note: Talk to your Retailers before enabling BOPIS. Not every store is equipped to stage orders or run them out to the curb, and each Retailer chooses which fulfillment methods it supports for your brand. Retailers have In-Store Pickup, Curbside Pickup, and Ship From Store turned on by default for active connections, but they can turn any of them off.
1. Configure your storefront
- Click Sales Channels in the left menu, then select Storefronts.
- Open your HoverCart storefront, go to the Storefront tab, and scroll to the bottom of the page.
- Set Distributed Fulfillment Rate Target above Fulfillers: 0%.
- Turn on Enable Fulfiller Inventory.
- Under Enabled Fulfillment Methods, check In-Store Pickup. Check Curbside Pickup too if you’re offering it (see Curbside Pickup below).
- Click Save.
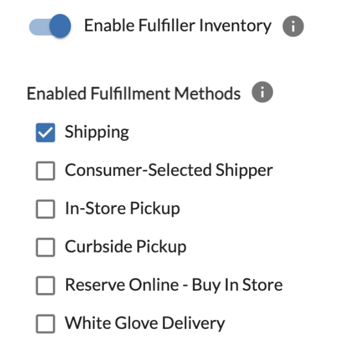
Note: If Distributed Fulfillment Rate Target is set to Fulfillers: 0%, every order on the storefront is Seller Exclusive and none reach Retailers, so BOPIS won’t work. Move the slider above 0% to make orders available to Retailers.
Note: In-Store Pickup, Curbside Pickup, and the other Retailer fulfillment methods stay greyed out until Enable Fulfiller Inventory is turned on. Fulfiller inventory is required for Auto-Assignment, and it lets Retailer stock count toward whether a product shows as in stock in the HoverCart.
Leave Shipping checked if you also want customers to be able to have items shipped. To run a pickup-only storefront, uncheck Shipping so customers only see pickup options.
2. Create a claiming policy for pickup
- Click Distribution in the left menu, then select Claiming Policies.
- Click + Add New Policy, give the policy a name, and click Add. (To edit an existing policy instead, click the blue pencil icon next to its name.)
- Click the blue pencil icon next to the new policy to open it.
- Set Policy Type to Fulfiller Available.
- Under Authorize by Catalog, check the catalog folders to include, or expand a folder to select individual products.
- Under Allowed Fulfillment Methods, check In-Store Pickup, plus Curbside Pickup if you’re offering it.
- To limit the policy to specific storefronts, turn on Restrict by Storefronts and check the storefronts it should apply to. If you leave it off, the policy applies to all storefronts.
- Click Save.
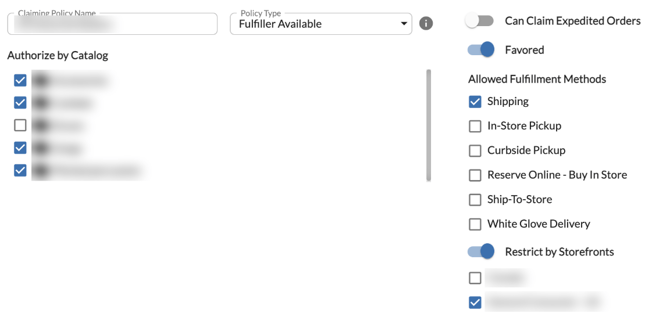
Note: A policy set to Merchant Exclusive keeps its products brand-only, so they’ll never be offered for pickup. And if In-Store Pickup isn’t checked under Allowed Fulfillment Methods, the HoverCart won’t offer pickup for the products on that policy, even if Retailers have stock.
For every setting on the policy, see Claiming Policies.
3. Turn on Auto-Assignment
- Click Distribution in the left menu, then select Order Routing.
- Enable Auto-Assignment.
- Optionally, under Additional Rules, set a Maximum Fulfiller Inventory Age.
Note: Auto-Assignment is required for BOPIS, because the order has to go straight to the Retailer the customer chose. If you set a Maximum Fulfiller Inventory Age, Retailers whose inventory hasn’t been updated within that many hours won’t appear in the pickup list. If you leave it blank, inventory age isn’t considered.
For the full list of routing settings, see Routing & Assignment.
4. Assign Retailers to the policy
You can assign Retailers to your pickup policy in three ways. Use whichever fits the size of your network.
Option A: From the claiming policy
At the bottom of the claiming policy from Step 2, under Connected Fulfillers, check each Retailer you want to include, or check Enable All.
Option B: From the Retailer
- Click Fulfillers in the left menu.
- Click Manage next to the Retailer.
- Under Manage Connection > Claiming Policies, turn on the toggle for your pickup policy.
- Under Claiming Regions, confirm the Retailer’s region is turned on.
Option C: Bulk Edit
To update many Retailers’ policies and regions at once, select them on the Connected tab of the Fulfillers list and click Bulk Edit. See Bulk Editing Fulfillers and Claiming Regions.
Note: Bulk Edit replaces each selected Retailer’s existing claiming policies and regions rather than adding to them. Include every policy and region the Retailers should keep, not just the pickup policy.
5. Adjust HoverCart catalog settings (optional)
Two HoverCart settings control how inventory shapes the pickup experience. Both live in the HoverCart Settings Manager:
- Click Sales Channels in the left menu, then select Storefronts.
- Click the pencil icon next to your HoverCart storefront.
- Click the Preview tab at the top.
- Log into the HoverCart Ribbon with an admin account, then click the Settings gear icon.
- Go to Catalog > Global.
|
Setting |
What It Does |
|---|---|
|
Limit “Choose Your Fulfiller” by Matching Inventory |
On: the pickup dialog only shows Retailers with a matching inventory record for the product. Off (default): nearby authorized Retailers without confirmed stock can also appear, with a Contact for Availability option. |
|
Limit Quantity Based on Inventory |
Yes: customers can’t add more units to the cart than are available. For pickup items, that’s the stock of the Retailer the customer chose. No: customers can order more than is currently in stock. |
Best Practice: Set Limit Quantity Based on Inventory to Yes for BOPIS storefronts. A customer who pays for more units than the store has is a customer who arrives to an incomplete order.
The Customer Experience
- A customer views a pickup-enabled product in your HoverCart storefront.
- On the product page, they select In-Store or Curbside instead of Shipping.
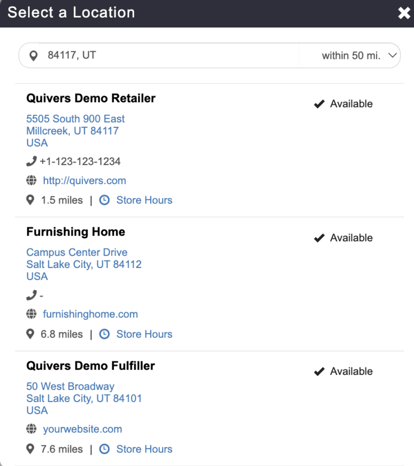
- A Select a Location dialog opens, showing nearby Retailers that can fulfill the item.
- The customer selects their preferred store, and the item is added to their cart for pickup from that store.
- They complete checkout and pay online. Pickup items are listed under a notice that they’ll be picked up and won’t be shipped, with no shipping charge.
- They receive an order confirmation email. Each pickup item is listed under Processing for Pickup with its pickup store’s name and address, and the email explains they’ll hear from you when the order is ready.
- The order is created in Quivers and assigned to the selected Retailer, who is notified.
- When the order is ready, the customer receives a Ready For Pickup email with the store address, business hours, and a QR code.
- The customer collects the order at the store, or at the curb for Curbside Pickup, and receives a Your pickup is complete! email.
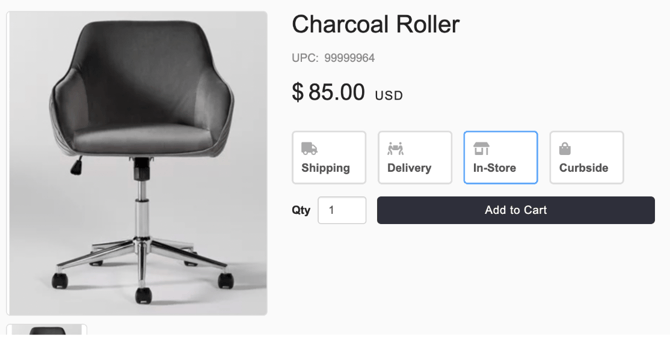
Only the options enabled on your storefront and claiming policy appear on the product page, so customers see just the fulfillment methods you offer for that product. A single cart can mix pickup items and shipped items, and customers can switch an item between In-Store Pickup and Curbside Pickup in the cart without losing the item or their chosen store.
Choosing a Pickup Location
- Location. The HoverCart uses the customer’s browser location. If location services are turned off or denied, it estimates the customer’s location instead, and the pickup options still load.
- Search and radius. Customers can search by Zip Code, city, or address, and use the radius dropdown (for example, within 50 mi.) to widen or narrow the results. The search uses Google Places autocomplete for accurate address matching and distances.
- Distance. Distances are shown in miles or kilometers based on the customer’s region, and international postal codes are supported.
- Large networks. In areas with many Retailers, results load in pages so the list stays fast and readable.
The pickup dialog is separate from the dialog used for Consumer-Selected Shipper, so customers can always tell whether they’re choosing a store to pick up from or a store to ship from.
What Each Retailer Listing Shows
- Retailer name
- Full store address
- Phone number and website
- Distance from the customer
- A Store Hours link that shows the Retailer’s hours
- Availability, such as Available when the Retailer has the item in stock
Retailer name, address, contact details, and hours come from each Retailer’s business settings in Quivers. Retailers need a complete address (street, city, state/province, postal code, and country) for their listing to display correctly.
Contact for Availability
When a nearby Retailer carries your brand but doesn’t have confirmed stock of the item, the customer sees a Contact for Availability button instead of an “Out of Stock” label. For Retailers that haven’t joined Quivers yet, only their city, state, and country are shown until the customer clicks the button. Clicking it reveals the Retailer’s phone number and website so the customer can reach out directly.
Each click is logged. Retailers already on Quivers are prompted to update or connect inventory for that item, and Retailers not yet on Quivers are invited to join, which helps grow your connected network over time.
Note: Contact for Availability only appears when Limit “Choose Your Fulfiller” by Matching Inventory is off (see Step 5). If no nearby Retailer has the item in stock at all, the customer sees a clear out-of-stock message rather than an empty list. And when Limit Quantity Based on Inventory is on, a customer who tries to add more units than are available is told how many are in stock.
Order Tracking
After checkout, the customer follows the order from My Orders under My Account in the HoverCart, which is also linked from the confirmation email. Each item shows its own status, so an order with pickups at two stores can show a different status for each:
|
Customer-Facing Status |
What It Means |
|---|---|
|
Pickup Pending |
The order has been placed and assigned to the Retailer, but isn’t ready yet. |
|
Ready for Pickup |
The Retailer has staged the order and the customer has been notified to collect it. |
|
Picked up |
The pickup has been confirmed. The item is complete. |
Every pickup item has an In-Store Pickup Details link that shows the customer’s pickup location. Once an item is picked up, a Request Return link also appears when returns are enabled for the storefront.
Items can be picked up from more than one Retailer in the same order. Each pickup item is assigned to the store the customer chose for it, and the confirmation email groups the items by pickup store.
How BOPIS Orders Are Handled in Quivers
Order Assignment and Labels
When a pickup order is placed, Quivers automatically assigns it to the Retailer the customer chose, with the fulfillment method set to In-Store Pickup or Curbside Pickup. The Retailer is notified by email, text, or the Quivers app. There’s no claiming window, since the customer has already picked the store.
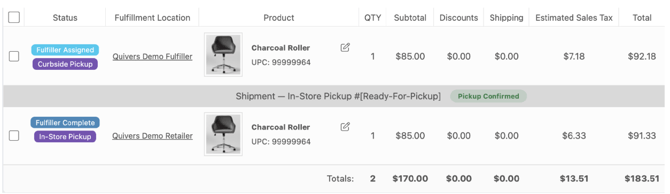
In your Admin Panel, pickup items show on both the Orders list and the order’s details page with two labels: a status, such as Fulfiller Assigned or Fulfiller Complete, and a fulfillment method, In-Store Pickup or Curbside Pickup. The Fulfillment Location column shows which Retailer each item is assigned to. Labels are set per line item, so an order with In-Store and Curbside items at different stores shows each one separately. See Orders in Quivers.
The Pickup Workflow
Pickup orders are processed the same way from the Retailer’s panel and from your brand’s Admin Panel, so your team follows these same steps if you need to process a pickup order yourself.
1. Mark the order Ready For Pickup
Open the order and stage the items. On the Process tab, click Ready For Pickup. A dialog confirms that this notifies the customer their items are available to pick up during the store’s configured business hours. Optionally, enter an External RefId, then click Ready For Pickup.
2. The customer receives the Ready For Pickup email
The email names the Retailer as your authorized fulfillment partner and includes the store address, the store’s Business Hours, and a QR code. It asks the customer to present the email with the QR code at the store, and to contact the store if they need more time to pick up.
On the order, the shipment row now reads Shipment — In-Store Pickup with a Needs Processing! badge, and Confirm Pickup replaces the Ready For Pickup button.
3. Confirm the pickup
When the customer arrives, click Confirm Pickup. The dialog reminds you to verify the customer’s identity in one of two ways: a government-issued ID that matches the customer’s name on the order, or the QR code from their email, which opens the order in the Quivers Claim mobile app when scanned. Hand over the items and click Confirm Pickup.
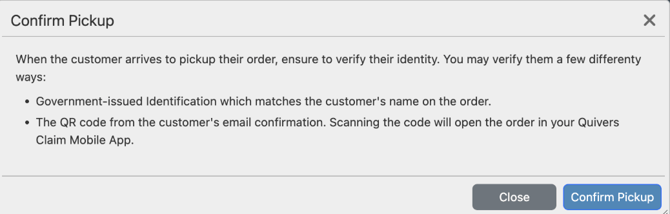
The item’s status changes to Complete, the shipment shows Pickup Confirmed, and the customer receives a Your pickup is complete! email with a Pickup Summary.
Note: Because pickups have no carrier tracking, a pickup item is marked delivered as soon as the pickup is confirmed, with its delivery date matching the hand-off date. Confirming the pickup also clears the shipping timer, so the order moves out of the active fulfillment queue and won’t be flagged Shipment Overdue.
When a Retailer Can’t Fulfill
If a Retailer can’t fulfill a pickup item, for example because the last unit sold in-store, they request an unclaim and you decide what happens next.
1. The Retailer requests an unclaim
From the order’s Process tab, the Retailer selects the item, clicks Actions > Request Unclaim, chooses a Cancellation Reason (such as Out of stock), and clicks Request Unclaim. In your Admin Panel, the item shows Fulfiller Unclaim Requested.
2. Approve or reject the request
Open the order, select the item, and click Actions. Choose Unclaim to approve the request, or Reject Unclaim Request to keep the item with the Retailer. When you approve, a dialog confirms the item will be put back to an available status. Click Unclaim.
3. Fulfill the item another way
The item returns as Seller Available and is no longer a pickup item: the In-Store Pickup or Curbside Pickup label is removed. From here you can:
- Ship it yourself. Add a shipping address first (see the Note below), then click Claim and use Create Shipment on the Ship tab. See Orders in Quivers.
- Offer it to Retailers again. Use the Resend action to send the item back out to Retailers for distributed fulfillment.
- Cancel it. Choose Cancel from the Actions menu if the item can’t be fulfilled at all.
Note: Pickup orders don’t have a shipping address. Under Customer Info on the order, Shipping Address reads “This order has no shipping address (it may have been purchased for In-Store Pickup).” Before you ship an unclaimed pickup item, contact the customer to let them know it will be shipped instead of picked up, and confirm where to send it. If it’s not their billing address, get the correct address. Then add it with the edit (pencil) icon next to Shipping Address.
Note: The customer paid no shipping on a pickup item, so the item still shows $0.00 shipping after it’s unclaimed. Estimated sales tax is recalculated for the new fulfillment location, since it’s no longer based on the Retailer’s address.
Best Practice: Review unclaim requests quickly. The customer is expecting to pick up, so the sooner you approve and reroute the item, or reject the request, the better their experience.
Switching a Shipped Item to Pickup
If a customer ordered an item for shipping but would rather pick it up, whoever has claimed the item, your team or the Retailer, can fulfill it as a pickup instead.
- On the order’s Ship tab, select the item and click Create Shipment.
- Under Tracking Info, set Shipping Method to In-Store Pickup or Curbside Pickup.
- Tracking Number is required, so enter a placeholder such as N/A.
- Click Save. The customer is emailed right away that their order is ready for pickup, so only save once the item is staged.
- When the customer arrives, click the orange Needs Processing! badge on the shipment, verify the customer, and click Confirm Pickup.
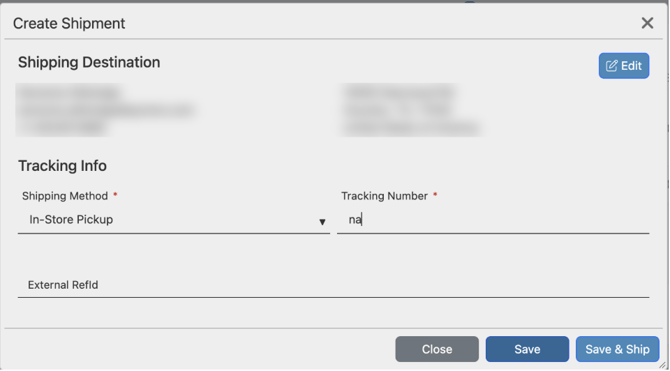

Note: If the customer is collecting the item right then, click Save & Ship instead of Save. This records the pickup as complete in one step, and the customer receives the Ready For Pickup and pickup confirmation emails together.
Note: If Save or Save & Ship doesn’t respond, click Edit next to Shipping Destination to see which required fields are missing.
Any shipping charged on the item is removed and refunded automatically, as described under Curbside Pickup > How Curbside Orders Are Handled.
Taxes & Returns
- Sales tax. Tax on pickup items (In-Store and Curbside) is calculated using the pickup Retailer’s business address, since that’s where the customer receives the item, not the customer’s shipping or billing address. The tax shown at checkout and in the confirmation email is an estimate, and any difference between the authorized amount and the final order total is refunded automatically.
- Returns. If Enable Returns is on for the storefront, customers can request a return from My Account in the HoverCart after pickup, the same as a shipped order. If it’s off, customers can’t request returns there, but your team can still create and process returns. See Orders in Quivers.
Curbside Pickup
Curbside Pickup is a type of In-Store Pickup for customers who’d rather not go inside. The customer pays online, drives to the store, and waits in their car while the Retailer brings the order out. Curbside is available for HoverCart storefronts only.
How Curbside Works
- The customer selects Curbside on the product page, then chooses a Retailer in the Select a Location dialog, where the Store Hours link shows when they can come by.
- The customer completes checkout. No shipping fee is charged on curbside items.
- The order is assigned to the Retailer, labeled Curbside Pickup.
- The Retailer stages the order and clicks Ready For Pickup, using the same dialog as In-Store Pickup.
- The customer receives a Ready For Pickup email with the store address, business hours, and an I Have Arrived button. The email tells them to press the button once they’re curbside and to have their QR code ready to scan.
- When the customer taps I Have Arrived, an Arrival Confirmation page lets them know the store has been notified, and the Retailer is alerted that the customer is outside.
- The Retailer brings the order out, verifies the customer with their QR code or ID, and clicks Confirm Pickup, the same as for In-Store Pickup. The customer receives a Your pickup is complete! email.
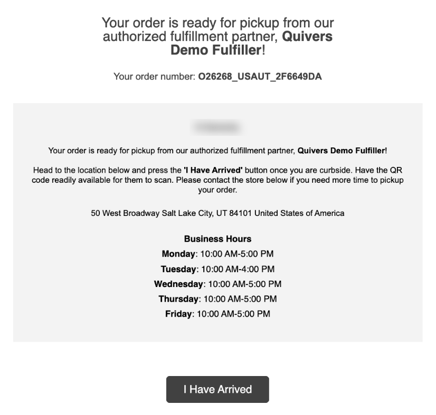
If no one comes out, the customer can tap Resend Notification on the Arrival Confirmation page to alert the store again.
Enabling Curbside Pickup
Curbside Pickup uses the same setup as In-Store Pickup, with Curbside turned on in each place:
- Storefront: Curbside Pickup checked under Enabled Fulfillment Methods (Step 1).
- Claiming policy: Curbside Pickup checked under Allowed Fulfillment Methods (Step 2).
- Retailer connection: The Retailer has Curbside Pickup turned on for your brand (on by default).
- Retailer store hours (recommended): The Retailer has entered store hours in their business settings, so customers can see when to come by in the Curbside dialog.
Note: Curbside Pickup is a fulfillment method, not a shipping method, so there’s nothing to set up under Settings > Shipping Methods.
How Curbside Orders Are Handled
- Shipping fees. Curbside items carry no shipping fee. If an item on an order placed for shipping is fulfilled as Curbside Pickup instead (see Switching a Shipped Item to Pickup), the shipping charged for it is refunded automatically. If the order’s payment hasn’t been captured yet, the refund is applied once the rest of the order has shipped and payment is captured.
- Taxes. Like In-Store Pickup, tax is calculated using the Retailer’s business address.
- Labels and statuses. Curbside items are labeled Curbside Pickup in the Admin Panel and are marked delivered once the Retailer confirms the hand-off.
BOPIS vs. Other Fulfillment Methods
|
BOPIS (In-Store / Curbside) |
ROPIS (Reserve for Pickup) |
Ship From Store |
|
|---|---|---|---|
|
Customer pays |
Online, at checkout |
In person, at the store |
Online, at checkout |
|
Customer receives item |
At the store or curb |
At the store |
Shipped to their address |
|
Who picks the Retailer |
The customer |
The customer |
Quivers routing (or the customer, if Consumer-Selected Shipper is enabled) |
For reservation-based pickup, see Reserve Online, Buy In-Store. To let out-of-stock Retailers participate by shipping inventory to their store, see the Ship-To-Store App.
Troubleshooting: Why Aren’t Pickup Options Showing?
If a product doesn’t show a pickup option, or the pickup dialog shows fewer Retailers than expected, check these common causes:
|
Cause |
What to Do |
|---|---|
|
In-Store Pickup and Curbside Pickup are greyed out in storefront settings |
Turn on Enable Fulfiller Inventory on the storefront’s Storefront tab. |
|
Distributed Fulfillment Rate Target is set to Fulfillers: 0% |
Move the slider above 0% so orders are available to Retailers. |
|
In-Store Pickup or Curbside Pickup isn’t checked on the storefront |
Check them under Enabled Fulfillment Methods on the storefront’s Storefront tab. |
|
The claiming policy is set to Merchant Exclusive |
Change Policy Type to Fulfiller Available. |
|
The product’s claiming policy doesn’t include In-Store Pickup |
Edit the policy under Distribution > Claiming Policies and check In-Store Pickup under Allowed Fulfillment Methods. |
|
The product isn’t included in the policy |
Check its folder or the product itself under Authorize by Catalog. |
|
Restrict by Storefronts is on and your storefront isn’t selected |
Check your storefront on the policy, or turn Restrict by Storefronts off. |
|
The Retailer isn’t assigned to the policy |
Add them under Connected Fulfillers on the policy, or from Fulfillers > Manage > Claiming Policies. |
|
The Retailer’s claiming region is off |
Turn it on from Fulfillers > Manage > Claiming Regions. |
|
Auto-Assignment is off |
Enable it under Distribution > Order Routing. |
|
The Retailer has no inventory in Quivers |
Check the Inventory column in the Fulfillers list, and ask the Retailer to connect inventory. |
|
The Retailer’s inventory is older than the Maximum Fulfiller Inventory Age |
Ask the Retailer to update inventory or use Mark as Current, or adjust the setting. |
|
The product variant has no UPC, SKU, or GTIN |
Add at least one identifier to the variant in your catalog. |
|
The Retailer’s identifiers don’t match yours |
Ask the Retailer to include your UPC, SKU, or GTIN on their inventory record. |
|
The Retailer has turned off pickup for your brand |
Ask the Retailer to re-enable In-Store Pickup or Curbside Pickup on their connection with you. |
|
Limit “Choose Your Fulfiller” by Matching Inventory is on and the Retailer has no record for the item |
Expected behavior. Turn the setting off to show those Retailers with Contact for Availability. |
|
The Retailer’s address is incomplete |
Ask the Retailer to complete their business address in Quivers. |
Best Practices & Tips
- Brief your Retailers. Make sure connected Retailers know how to stage pickup orders, mark them Ready For Pickup, verify customers, and handle Curbside arrivals before you turn BOPIS on.
- Get inventory flowing first. Ask Retailers to add inventory to Quivers before you enable Auto-Assignment. Without it, there’s nothing for pickup options to be built from.
- Keep identifiers consistent. Give every variant a UPC, SKU, or GTIN, and encourage Retailers to use the same identifiers in their inventory.
- Set an inventory age your Retailers can meet. A shorter Maximum Fulfiller Inventory Age keeps listings accurate, but Retailers will need to update more often to stay visible.
- Choose your list strategy. Leave Limit “Choose Your Fulfiller” by Matching Inventory off to maximize local visibility and Contact for Availability leads, or turn it on to show only stores that have stocked the product.
- Limit quantities to stock. Set Limit Quantity Based on Inventory to Yes so customers can’t pay for more units than their chosen store has.
- Encourage accurate store details. Retailer addresses and store hours appear in the pickup dialog and drive tax calculations, so ask Retailers to keep them current.
- Make sure someone gets arrival alerts. For Curbside, at least one person at each store should have Quivers notifications turned on during store hours so customers aren’t left waiting.
Frequently Asked Questions
What’s the difference between BOPIS and ROPIS?
With BOPIS, the customer pays online at checkout and picks up the order. With ROPIS (Reserve for Pickup), the customer reserves the item without paying and completes the purchase at the store.
What’s the difference between In-Store Pickup and Curbside Pickup?
Both let customers pay online and collect from a Retailer. With In-Store Pickup, the customer goes inside. With Curbside Pickup, the customer waits in their car, taps I Have Arrived in their Ready For Pickup email, and the Retailer brings the order out.
Why can’t I check In-Store Pickup on my storefront?
Enable Fulfiller Inventory is off. Turn it on from the storefront’s Storefront tab, and the Retailer fulfillment methods, including In-Store Pickup and Curbside Pickup, become available to select.
Does the Distributed Fulfillment Rate Target affect BOPIS?
Yes. At Fulfillers: 0%, every order is Seller Exclusive and none reach Retailers, so BOPIS won’t work. Set it above 0%.
Why is Auto-Assignment required for BOPIS?
The customer chooses the Retailer at checkout, so the order needs to be assigned directly to that store rather than offered to Retailers to claim. Auto-Assignment handles that assignment.
Do Retailers have to opt in to BOPIS?
Retailers have In-Store Pickup, Curbside Pickup, and Ship From Store turned on by default for active brand connections, but each Retailer can turn any method off for your brand.
Can I offer pickup for only some products?
Yes. Only products selected under Authorize by Catalog on a policy with In-Store Pickup checked will show a pickup option. Check whole catalog folders, or expand a folder to choose individual products.
Can I run a pickup-only storefront?
Yes. Check In-Store Pickup (and Curbside Pickup, if desired) and uncheck Shipping under Enabled Fulfillment Methods on the storefront’s Storefront tab.
What’s the fastest way to add pickup to many Retailers?
Check Enable All under Connected Fulfillers on the claiming policy, or use Bulk Edit from the Fulfillers list. Bulk Edit replaces each Retailer’s existing policies and regions, so include everything they should keep.
Why don’t some of my Retailers appear in the pickup list?
The most common causes are stale inventory, product identifiers that don’t match, the Retailer not being assigned to the pickup policy or having its claiming region turned off, or the Retailer having turned off pickup for your brand. See the Troubleshooting table above.
Why does a product show no Retailers at all?
Check that each variant has at least one identifier (UPC, SKU, or GTIN). If identifiers are in place, work through the Troubleshooting table.
What does “Contact for Availability” do?
It replaces an “Out of Stock” label for nearby Retailers that carry your brand but don’t have confirmed stock. Clicking it reveals the Retailer’s contact details, logs the click, and prompts the Retailer to connect inventory or invites them to join Quivers.
Can customers order more units than a Retailer has in stock?
Not if Limit Quantity Based on Inventory is set to Yes in the HoverCart Settings Manager (Catalog > Global). For pickup items, the limit is based on the stock of the Retailer the customer chose. If the setting is No, customers can order more than is in stock.
Where do I find the HoverCart catalog settings?
Open your storefront from Sales Channels > Storefronts, click the Preview tab, log into the HoverCart Ribbon with an admin account, click the Settings gear icon, and go to Catalog > Global.
What if the customer has location services turned off?
The Select a Location dialog still loads. The HoverCart estimates the customer’s location, and the customer can search by Zip Code, city, or address and adjust the search radius.
Can a customer have pickup items and shipped items in the same order?
Yes. Pickup and shipped items can be combined in one cart. Pickup items carry no shipping charge, and each part of the order is fulfilled through its own workflow.
Can one order include pickups from more than one Retailer?
Yes. Each pickup item is assigned to the store the customer chose for it, and the confirmation email lists the items grouped by pickup store.
Can a customer switch an item between In-Store Pickup and Curbside Pickup?
Yes. The customer can change the pickup method in the cart without losing the item or their chosen store.
What if a Curbside customer taps I Have Arrived and no one comes out?
The Arrival Confirmation page has a Resend Notification button that alerts the store again. Make sure someone at each store has Quivers notifications turned on during business hours.
Is confirming a Curbside pickup different from In-Store Pickup?
No. The Retailer uses the same Ready For Pickup and Confirm Pickup steps. The only difference is that the customer waits outside and taps I Have Arrived instead of coming in.
Can I switch an item from shipping to pickup after the order is placed?
Yes. On the Ship tab, click Create Shipment, set Shipping Method to In-Store Pickup or Curbside Pickup, enter a placeholder Tracking Number such as N/A, and click Save. The customer is emailed that their order is ready, and you confirm the hand-off from the Needs Processing! badge. Use Save & Ship instead if the customer is collecting the item right then.
Are shipping fees charged on Curbside orders?
No. Curbside items carry no shipping fee. If an item on an order placed for shipping is fulfilled as Curbside Pickup instead, the shipping charged for it is refunded automatically, once the full order has shipped and payment has been captured.
Can BOPIS be used for FFL-regulated products?
Generally, no. FFL-regulated products can’t be paid for online through Quivers’ payment processing, so they aren’t a fit for BOPIS. Use ROPIS instead, where the customer pays in person at the store. See Reserve Online, Buy In-Store.
Why does a pickup item show as delivered right after hand-off?
Pickups have no carrier tracking, so Quivers marks the item delivered as soon as the Retailer confirms the hand-off, with a delivery date matching the hand-off date. Confirming the pickup also clears the shipping timer, so the order won’t show as Shipment Overdue.
Do I need to add Curbside Pickup under Settings > Shipping Methods?
No. Curbside Pickup is a fulfillment method, turned on in your storefront and claiming policy. Shipping Methods are only for carrier and delivery services.
How is the customer verified at pickup?
Before clicking Confirm Pickup, the Retailer checks a government-issued ID that matches the customer’s name on the order, or scans the QR code from the customer’s Ready For Pickup email, which opens the order in the Quivers Claim mobile app.
What emails does the customer receive for a pickup order?
An order confirmation when they check out, a Ready For Pickup email with the store address, business hours, and a QR code when the order is staged, and a Your pickup is complete! email after the pickup is confirmed.
Can my team process a pickup order from the brand’s Admin Panel?
Yes. The steps are the same as in the Retailer’s panel: Ready For Pickup on the Process tab, then Confirm Pickup when the customer arrives.
What happens if a Retailer can’t fulfill a pickup order?
The Retailer requests an unclaim with a cancellation reason, and the item shows Fulfiller Unclaim Requested. You approve it with Actions > Unclaim, or keep it with the Retailer with Reject Unclaim Request. Once approved, the item returns as Seller Available without a pickup label, and you can claim and ship it yourself, resend it to Retailers, or cancel it.
Where do I ship an unclaimed pickup item?
Pickup orders have no shipping address. Contact the customer to confirm where to send it, and if it’s not their billing address, get the correct address. Add it with the edit icon next to Shipping Address under Customer Info on the order before creating the shipment.
Why does an unclaimed pickup item show $0.00 shipping?
The customer didn’t pay shipping when they chose pickup, so none carries over when the item is unclaimed and shipped instead.
How is sales tax calculated on pickup orders?
Using the pickup Retailer’s business address, not the customer’s shipping or billing address. This applies to both In-Store and Curbside Pickup.
Can customers return items they picked up?
Yes, if Enable Returns is on for the storefront. The customer requests the return from My Account in the HoverCart. If Enable Returns is off, customers can’t request returns there, but your team can still create them.
Can I use BOPIS with a plugin storefront instead of the HoverCart?
This article covers HoverCart storefronts. In-Store Pickup is available for some eCommerce plugins, and Curbside Pickup is HoverCart only. See the articles in Plugins.