
In This Article
- Overview
- Order Overview Panel
- Order Overview Columns
- Order Details Panel
- Order Processing Workflow
- Frequently Asked Questions
Overview
The Orders section in Quivers allows Sellers to manage customer orders from start to finish — including reviewing, claiming, shipping, and processing returns or refunds. It's divided into two key panels:
- Order Overview Panel – Provides a summary view of all orders.
- Order Details Panel – Allows for item-level management and fulfillment actions.
Order Overview Panel
The Order Overview Panel gives a high-level, list-style view of all orders and helps users quickly locate, filter, and manage them.
Main Features
- Status Counts: Quick-glance counts across the top of the panel — To Do, Review, Available, Claimed, Shipment Overdue, Pending Returns, Unclaim Requested, and Any Hold Status — so you can see at a glance where your orders stand, and jump straight to a status.
- Filters: Use the Filters button to build custom filters, Add Filter to layer on additional criteria, and Clear Filters to reset. Active filters — like Storefront — appear as chips you can adjust directly.
- Search: Find orders by Order ID, Product Name, Customer Name, or Email using the Search Orders bar.
- Open in New Tab: Ctrl+click (or right-click) an order row to open that order in a new tab, so you can review multiple orders side by side.
- Copy Order ID: Click the Quivers Order ID in the list to copy it directly, without needing to open the order first.
- Import Shipments: Upload shipment data in bulk.
- Export: Download the current order list.
- Bulk Print: Select multiple orders to generate packslips or receipts in one action.
- Column Customization: Click the gear icon next to Bulk Print to open Order List Display Settings, where you can toggle individual columns on or off — including Location and Quantity, which are hidden by default.
- Refresh Orders: Click the refresh icon to check for new orders placed since your last update.
- Pagination: Set how many orders appear per page and step through pages at the bottom of the list.
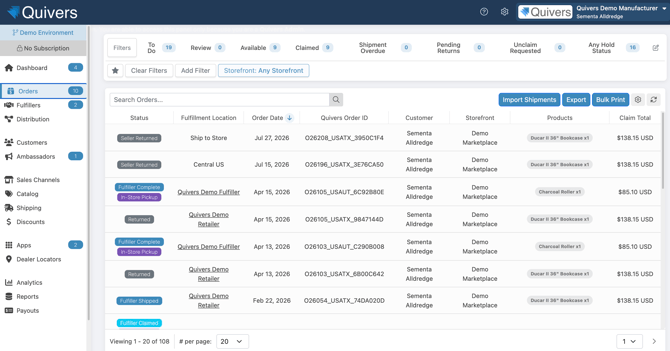
Order Overview Panel — status counts, filters, search, and the order list
Order Overview Columns
The following columns are available on the Order Overview list. Use Column Customization (see above) to show or hide any of them; Location and Quantity are hidden by default.
|
Column |
Description |
|
Order Date |
The date the order was placed; click the column header to sort. |
|
Quivers Order ID |
The unique Quivers ID assigned at checkout. |
|
Inbound Order ID |
The order number from the originating e-commerce platform (e.g., Shopify, WooCommerce, Magento 2). |
|
Outbound Order # |
The order number utilized for ERP purposes. |
|
Customer |
The ship-to customer's name. |
|
Location |
Customer's shipping region or address summary. Hidden by default. |
|
Storefront |
The storefront where the order originated. |
|
Products |
The item(s) in the order. |
|
Quantity |
Total number of units in the order. Hidden by default. |
|
Claim Total |
Amount the fulfiller will receive upon fulfillment. |
|
Fulfillment Location |
The retailer, fulfiller, or delivery method assigned to the order (e.g., a named fulfiller, “Ship to Store,” or a region). |
|
Status |
Indicates where the order is in the fulfillment process (e.g., Fulfiller Claimed, Fulfiller Shipped, Seller Returned). |
|
Custom Fees |
One column per distinct custom fee (e.g., an Environmental Handling Fee), toggled on or off individually. Also included in the Orders/Order Details CSV export, inserted just before the Customer Total column. |
The Order Details Panel allows users to manage each order individually, including its fulfillment progress, payments, and returns.
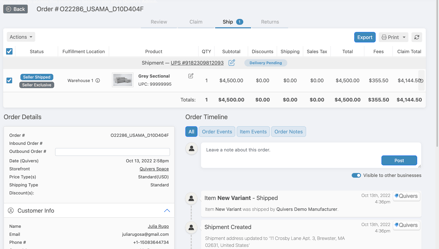
As part of the new Order Details UI, seller-fulfilled line items show the specific warehouse the item was sourced from, in place of the previous generic “Direct Fulfillment” label. Hovering over the label shows the stock position and priority for each candidate warehouse at the time the order was placed — for example, how many units were available at each warehouse and why a given warehouse was selected as the source.
Order Header Information
The top section of an order displays essential information:
- Order ID and Date/Time
- Storefront (Originating location; clickable link to the storefront page)
- Settlement Account (Shown in the Payment section, hyperlinked to the settlement breakdown with the order automatically searched for you)
- Shipping Option (Standard, Expedited, etc.)
- Currency and Payment Method
- Discount Codes (If applicable — the actual code is now shown alongside the discount name)
- Customer Info (Name, Email, Phone, Consumer Groups)
- Shipping and Billing Addresses
- Customer Notes (Visible to the customer)
- Staff Notes (Internal only)
- Inbound Order # (Order Number from e-commerce platform — Shopify, WooCommerce, Magento 2, etc.)
- Outbound Order # (Order Number utilized for ERP purposes)
Note: The order-level reference number is labeled “Outbound Order #” on both the Order Details Panel and the Order Overview list. This is separate from a shipment's own External RefId, which is entered when creating a shipment and appears next to that shipment's tracking number.
Order Processing Workflow
The Order Processing Workflow represents the typical sequence an order follows — from review through to shipment and possible returns, including full visibility into fulfiller access for each item. For a summary of this, view Order Actions.
1. Review / Fraud Review
When an order is placed, it may first appear under Review while automated fraud checks run. If potential fraud is detected, status changes to Fraud Detected, and two buttons appear: Bypass and Cancel.
- Bypass: Override the decline and process the order — you accept liability for the fraud risk.
- Cancel: Accept the decline and cancel the order.
- Doing nothing leaves the order under review until it's automatically canceled.
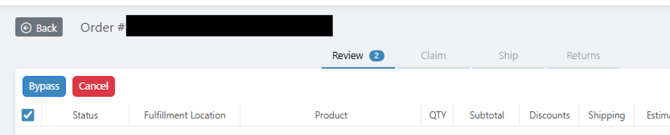
For more information, view How to Override a Fraud Decline.
2. Claim
In the Claim tab, users can accept responsibility for fulfilling specific items.
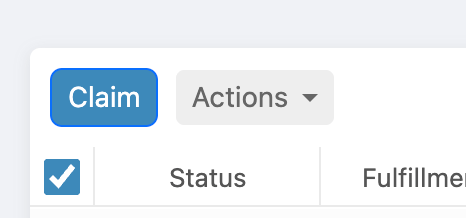
- Select items and click Claim to take ownership.
- Click Actions, then select Unclaim to release items back into the available pool.
3. Cancel
Orders or individual items can be canceled from the Order Details Panel before they are shipped.
- Open the order in the Order Details Panel.
- Select the checkbox next to the item(s) you want to cancel.
- Click Actions, then select Cancel.
- Choose a Cancel Reason from the dropdown list.
- Confirm the action in the pop-up window.
Once confirmed, the order or selected items will be marked as Canceled, and the customer will automatically be notified.
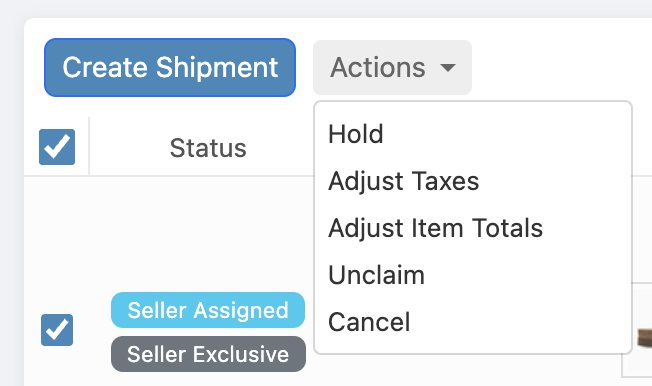
Note: The Actions dropdown handles several item-level actions beyond Cancel — including Hold, Adjust Taxes, Adjust Item Totals, and Unclaim — so make sure Cancel is the option you select.
Best Practice: Cancel orders as early as possible — including any test orders — to keep reporting and settlements accurate, and to avoid any payment processing fees if not canceled in a timely manner.
For more information, view our Cancelling an Order or Items knowledge base article.
4. Send to Fulfiller / Resend
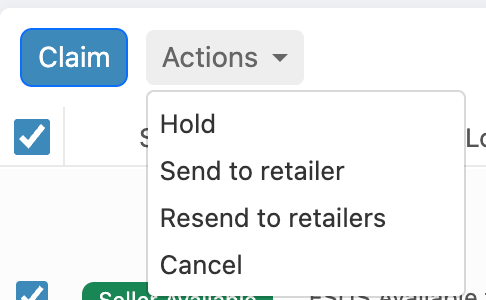
Select the checkbox next to the item(s), then click Actions to choose:
-
Send to retailer: Assign the item to a designated fulfiller for a set period.
- Resend to retailers: Re-publish the item to all eligible fulfillers immediately, overriding any active timers.
Note: For unclaimed items, the Actions dropdown also includes Hold and Cancel alongside Send to retailer and Resend to retailers.
5. Ship
In the Ship tab:
- Select claimed items.
- Click Create Shipment.
- Add Carrier and Tracking Information.
- Choose “Save Changes and Ship” to mark as shipped & notify the customer and trigger settlement.
- You can choose “Save Changes” if you're not ready to alert the customer yet, just ensure you click “Ship” when you are ready to alert the customer and trigger a settlement payout.
You can edit tracking details prior to marking shipments as complete. If any items are greyed out, it means they are not eligible for shipment yet — typically because they're unclaimed, already shipped, or pending another fulfillment action.
For more information, view Shipping an Order or Part of an Order.
6. Returns & Refunds
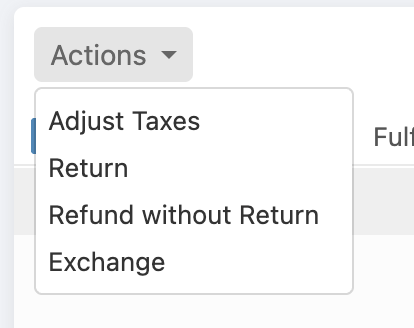
Returns and refunds can be initiated by either the customer or the Seller. Select the checkbox next to the item(s), then click Actions to choose:
- Return: Start a standard — the item is shipped back before the customer is refunded.
- Refund without Return: Refund the customer without requiring the item to be shipped back.
- Exchange: Process an exchange for a different item.
- Choose refund type (full, partial, or custom).
- Approve or deny customer return requests.
- After receipt, click Refund Customer to finalize the refund.
For more information, view Returns, Refunds, & Exchanges.
Note: Fulfiller-claimed items are deselected by default in the Order Details Panel. If you're a Seller performing a refund action (Return, Refund without Return, or Exchange) on behalf of a dealer/retailer, make sure to select the checkbox next to those items first — otherwise Actions won't apply to them.
7. Timeline & Fulfiller Access
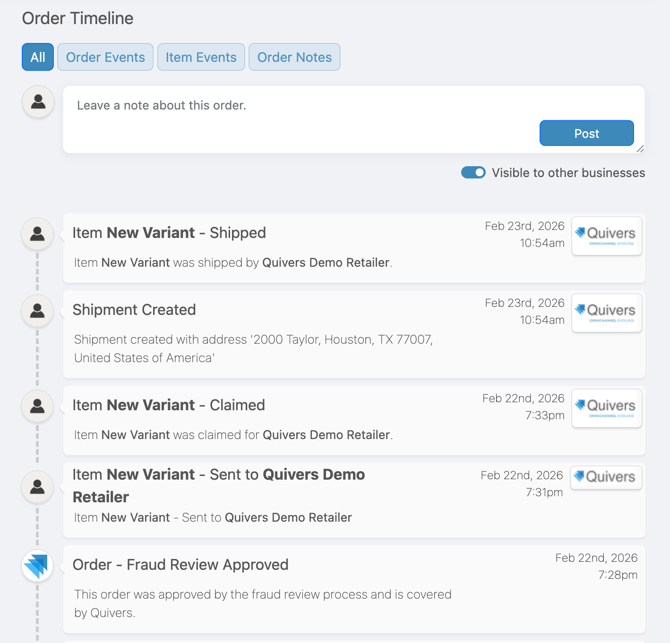
Each order includes a Timeline view showing a complete history of actions, such as:
- Claiming, shipping, and return activity
- Notifications sent to the customer
- User actions with timestamps
- Notes added by staff
- Unclaim reasons, logged whenever an unclaim is requested for an item
- Use the All, Order Events, Item Events, and Order Notes tabs at the top of the Timeline to filter what's shown.
- Leave a note about the order directly from the Timeline, and use the Visible to other businesses toggle to control whether fulfillers/retailers can see it.
- Hover over the profile icon next to any event to see the name and email of the person who performed that action.
This feature ensures full visibility for tracking and resolving order issues.
Fulfiller Access Timeline (Item-Level)
For Sellers using beaconing or assignment-based order routing, each line item on the Order Details Panel now includes its own Fulfiller Access Timeline — an expandable view showing exactly which fulfillers had access to that specific item, and what happened during that access window.
- Click the arrow next to a line item to expand its Fulfiller Access Timeline. It's closed by default so it doesn't clutter the main order view, and can be expanded alongside the overall order Timeline.
- Rows are sorted by time, with one row per fulfiller that had access to the item.
- This view is only visible to Sellers.
The columns shown are:
- Fulfiller – the fulfiller being shown; your own business is marked “You.”
- Availability Time – when the item became available to that fulfiller.
- Timer Type – the type of assignment timer that applied to that fulfiller's access window (e.g., Local, Default Fallback).
- Inventory – that fulfiller's available stock for the item at the time, if known (shown as a dash when not available).
- Distance – the fulfiller's distance from the shipping address.
- Assigned – whether the item was ultimately assigned to that fulfiller, shown with a status indicator.
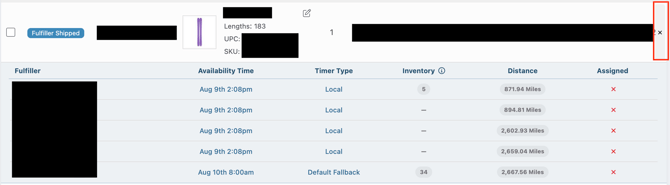
Fulfiller Access Timeline expanded under a line item, showing each fulfiller's access and claim status
Frequently Asked Questions
What's the difference between the Order Overview Panel and the Order Details Panel?
The Order Overview Panel gives you a summary, list-style view of all your orders so you can search, filter, and bulk-print across them. The Order Details Panel is where you manage a single order — claiming, shipping, canceling, and processing returns for its individual items.
Why are Export and Bulk Print greyed out?
These actions require at least one order (or item, on the Order Details Panel) to be selected via its checkbox first. Once something is selected, the buttons become active.
Where can I find the settlement or Paylution account for an order?
In the Payment section of the Order Details Panel. The Settlement Account is shown there and is hyperlinked directly to the settlement breakdown, with the order already searched for you.
I can only see the discount name — where's the actual discount code?
The discount code now displays alongside the discount name in the order header, so you can see both at a glance.
Are custom fees like an Environmental Handling Fee included in the CSV export?
Yes. Each distinct custom fee gets its own column in the Orders/Order Details export, using the fee's own name, positioned just before the Customer Total column.
Why does a line item show a warehouse name instead of “Direct Fulfillment”?
With the new Order Details UI, seller-fulfilled items show which warehouse they were sourced from instead of the generic Direct Fulfillment label. Hover over it to see the stock position and priority across candidate warehouses at the time the order was placed.
What do the status counts at the top of the Order Overview Panel mean?
They give you a quick-glance count of orders in each status — To Do, Review, Available, Claimed, Shipment Overdue, Pending Returns, Unclaim Requested, and Any Hold Status — so you can see where things stand and jump to a status without building a filter from scratch.
Can I open multiple orders at once from the Order Overview Panel?
Yes. Ctrl+click (or right-click) an order row to open it in a new tab instead of navigating away from the list, which makes it easier to review several orders side by side.
What happens if an order is flagged as Fraud Detected?
Two buttons appear: Bypass (override the decline, process the order, and accept liability for the fraud risk) and Cancel (accept the decline and cancel the order). If you do nothing, the order stays under review until it's automatically canceled.
Can I cancel just one item instead of the whole order?
Yes. From the Order Details Panel, select the checkbox next to the specific item(s) you want to cancel, then click Cancel Items and choose a Cancel Reason — the rest of the order is unaffected.
What's the difference between “Send to Fulfiller” and “Resend”?
Send to Fulfiller assigns the order to one designated fulfiller for a set period. Resend re-publishes the order to all eligible fulfillers immediately, overriding any active timers.
How are retailers ordered in the “Send to Retailer” list?
Retailers are sorted by inventory availability first — those who carry the item appear at the top — and then secondarily by distance from the shipping address, so the closest carrying retailers show first.
Can I ship only part of an order?
Yes. Select just the claimed items you're ready to ship in the Ship tab and create a shipment for those — items that are unclaimed, already shipped, or pending another action will appear greyed out until they're eligible.
What's the difference between “Save Changes” and “Ship” when creating a shipment?
“Save Changes” lets you enter or update tracking details without notifying the customer yet. “Save Changes and Ship” marks the item as shipped, notifies the customer, and triggers settlement — use that once you're ready for both to happen.
Who can initiate a return — the customer or the Seller?
Either one. Once a return is created, you can choose a full, partial, or custom refund type, approve or deny the request, and click Refund Customer after the item is received to finalize it.
Why can't I perform a refund action on a dealer/retailer's behalf?
Fulfiller-claimed items are deselected by default. Select the checkbox next to those items first, then use Actions to choose Return, Refund without Return, or Exchange.
Where can I see why an item was unclaimed?
In the order's Timeline. Whenever an unclaim is requested for an item, the reason is logged there alongside the rest of the order's history.
How can I see who (which person) performed an action on an order?
Hover over the profile icon next to any Timeline event. A tooltip will show the name and email of the person who performed that action.
Who can see the Fulfiller Access Timeline?
Only Sellers can see it. It isn't visible to fulfillers/retailers, since it's meant to give brands visibility into how their own beaconing or assignment-based order routing is performing.
Why don't I see a Fulfiller Access Timeline on some items?
This view is built for beaconing and assignment-based order routing. If an item isn't distributed that way, or if your account isn't using those claiming settings, you won't see this expanded view for that item.
Why does the Inventory column show a dash instead of a number?
A dash means that fulfiller's available stock for the item isn't known at that time, rather than meaning zero units are available.
Does expanding the Fulfiller Access Timeline change the order in any way?
No. It's a read-only view — expanding it only shows you the item's access history and doesn't affect claiming, shipping, or any other order action.
Can I still see the overall order Timeline at the same time as the Fulfiller Access Timeline?
Yes. The Fulfiller Access Timeline is scoped to a single line item and can be expanded alongside the order-level Timeline, so you can view both at once.