You can manage your program through the “Ambassador” tab, where the rest of your setup can be completed and updated at any point during the program.
Configuring your Program Settings
From the “Settings” tab of your new Ambassador Portal, you can customize the functionality of your portal:
- The Enable/Disable Sales Upload controls whether or not your ambassadors can manually upload their sales. Manually uploaded sales must be approved before they can be attributed to the Ambassador tied to the sale. Sales can be approved by the brand directly or an associated Sales Representative.
Setting:

Result:

- Enable/Disable Leaderboard: Enabling this will allow ambassadors to see their sales in comparison to other users of the same portal.
Setting:

Result:

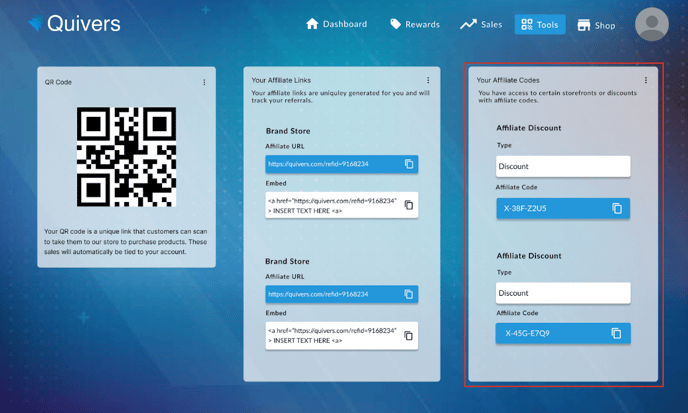
- Enable Affiliate Link: Here you can enter the base URL of the link - a unique link will then be generated for each of your ambassadors that link to your storefront - any sales generated from the link will be attributed to the ambassador e.g. your base link could be www.quivers.ambassador.com , unique links will be created from this for each ambassador e.g. www.quiversambassador.com/ref1 (these are example links)
Setting:

Result:

- Enable Affiliate Code: Here you can create codes that can be distributed to consumers, giving them access to a private storefront, or giving them a discount on a regular storefront. A unique code will be created for each ambassador in the program. See How to Create a Discount for more information about discounts.
Setting:

Result:
- Enable/Disable Associate Store: To enable an associated store, select between providing a URL to an external website or enabling a new or existing Hovercart storefront. You can customize the label of your store button.
Setting:

External Shopping Experience
The URL type will allow you to link out to any external shopping experience if you already have an existing program running or want to link directly to your website.
Storefront
Set up a full store shopping experience embedded directly into the portal. To set up a full store you will need to upload your Product Catalog and Create a Storefront . Some other panel settings like Shipping and Claiming Policies need to be configured to sell online through the portal.
Result:

NOTE: To use certain aspects of Program Rewards, you will need to turn a dedicated storefront on for your program - this includes a template of products from your catalog.
- Enable Ambassador Portal Goals: Set goals for your program, including referred sales (how much you want each new ambassador to generate) and the number of new customers referred in through affiliate links.
Setting:

- Enable Employee Registration: Choose how you want ambassadors to register for your program:
- Existing Consumers Only
- Store Number
- Invite Link only
Setting:

Customizing your Portal Appearance
From the “Appearance” tab you can customize the look of your portal

- Upload a Logo
- Login Title: This will be what your ambassadors are greeted with.
- Login Message: Short description to appear under the title.
- Custom CSS: Add any custom CSS you’d like in this field
- Background Image: Upload your chosen background image.
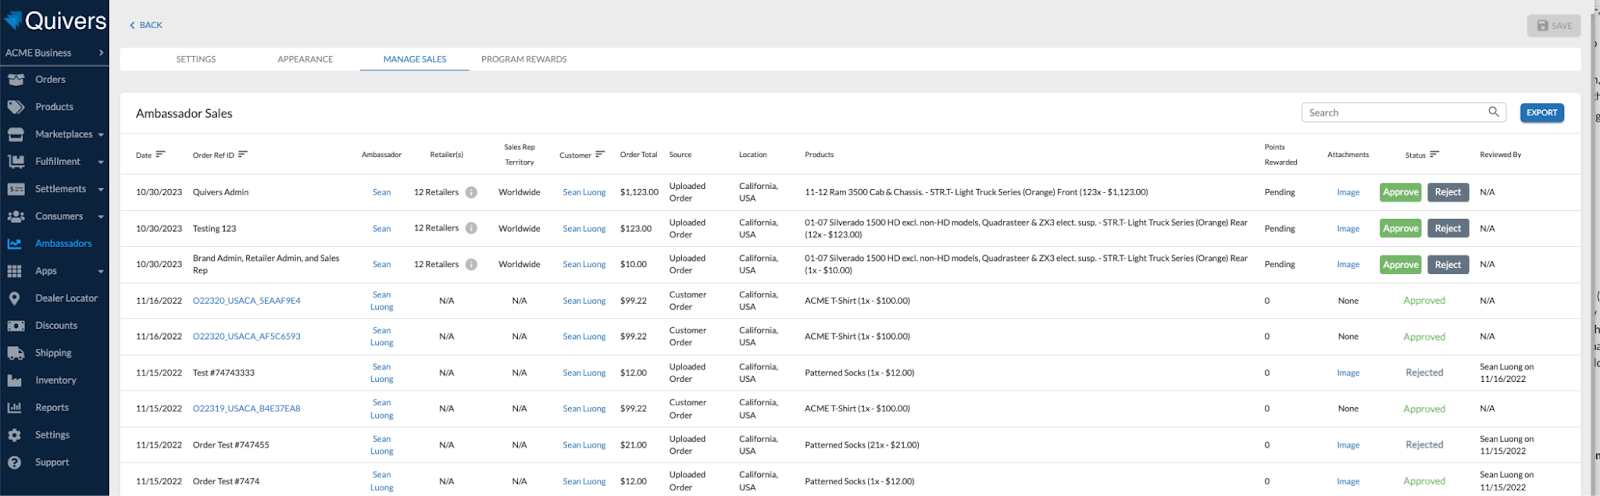
Manage Sales
From the “Manage Sales” tab, you can view the sales attributed to each of your Ambassadors.
If you have enabled “Sales upload”, then Ambassador sales that have been uploaded through the portal will appear here for approval.
This view shows:
- Date of the sale
- Order Number
- Portal - the ARM Portal it was uploaded on
- Ambassador Name
- Retailer
- Customer
- Order Total
- Location
- Products
- Source (this will be Uploaded Order)
- Attachments - proof of sale
- Status - Pending / Approved / Rejected
- Reviewed by - who has approved/rejected the sale and when