This article will walk you through creating your Storefronts and editing your Storefront Templates. “Storefronts” are how products can be sold through Quivers. The Storefront Type determines if a storefront is for the Quivers HoverCart or your eCommerce Platform. “HoverCart” type storefronts use “Templates,” which determine how your products will be categorized and sold in the HoverCart. “Templates” can be used across many storefronts, so a single template can be used if you want to sell the same products across many different price types.
A Storefront is also connected to a price type, which determines the currency and price of the products sold in that storefront. If you need help setting up your price types, please refer to this article: How to Set Up Price Types.
How to Create a HoverCart Storefront:
- Log Into Quivers and click into the “Sales Channels” tab on the left menu of the Quivers Panel. When that drops down, click “Storefronts.”
- Once you have arrived in “Storefronts”, you can create new Storefronts or edit existing Storefronts. To create a new Storefront, click on the blue “Add Storefront” button in the upper right corner of the storefronts screen.
- Name your storefront by filling in the "Storefront Name" field and selecting the HoverCart option in the "Choose Storefront Type" dropdown. “HoverCart” type storefronts will require a Template (you can either create a new template that will need a name or use an existing one).
- Choose a price type from the dropdown under "Price Type"
- Choose a settlement account from the dropdown under "Settlement Account"
- If this is the first Storefront, you will be prompted to provide accounting details for the settlement process.
- You must utilize QuiversPay if you're creating a HoverCart storefront.
- Click "Create," and you are ready to set up your storefront!
How to Create an eCommerce Storefront (Plugin):
.gif?width=688&height=369&name=Creating%20an%20eCommerce%20Storefront%20(plugin).gif)
- Log Into Quivers and click into the “Sales Channels” tab on the left menu of the Quivers Panel. When that drops down, click “Storefronts.”
- Once you have arrived in “Storefronts”, you can create new Storefronts or edit existing Storefronts. To create a new Storefront, click on the blue “Add Storefront” button in the upper right corner of the storefronts screen.
- Name your storefront by filling in the "Storefront Name" field and select your eCommerce option in the "Choose Storefront Type" dropdown - storefronts for plugins will not require a template.
- Choose a price type from the dropdown under "Price Type"
- Choose a settlement account from the dropdown under "Settlement Account"
- If you are planning to use an External Payment Gateway, select "New Settlement Account" under this option. Under "Payment Gateway Type" select "External Gateway".
- If you are planning to use Quivers as your payment processor, either create a new settlement account or choose an existing.
- If this is the first Storefront, you will be prompted to provide accounting details for the settlement process.
- Click "Create," and you are ready to set up your storefront!
Setting up your Storefront:
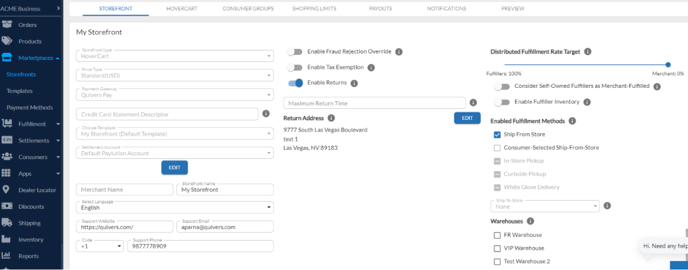
Provide your Merchant name - this is the name that will be displayed on customer communication and notification. You will also want to populate the remaining customer support details for this storefront, such as the support website, email, and phone number, for use in customer-facing emails.
From here, you can confirm the settings for how your storefront behaves.
- Enable Fraud Rejection: Quivers automatically reviews all orders to determine if they are fraudulent purchases. Enabling this setting will allow you to override a fraud detection from our system and proceed with fulfillment. If you override fraud rejection, you will be liable for any chargebacks or disputes on that order.
- Enable Tax Exemption: If enabled, items will be exempt from sales tax. We suggest that this only be enabled if the storefront is used for B2B commerce. This will automatically set the Fulfiller Availability Rate to 0%. You also have the ability to set up a tax-exempt Consumer Group, for more information on this please contact support@quivers.com
- Enable Returns: If set to NO, consumers will not be able to request a return through their My Account for orders placed through this storefront, and their shipping notification will not indicate that returns are possible. The business can still create and process returns if needed.
- Maximum Return Time: This field is the maximum number of days (between 1 - 180) for returns/refunds. If left blank, this field assumes the max (180 days) which is the default unless changed.
- Return Address: Here you can specify where you want returns to be sent. Please note that this will only be available to orders you have fulfilled, any orders fulfilled by a Fulfiller will have their contact information.
- Distributed Fulfillment Rate Target: Orders will alternate between Seller Exclusive and Available to Fulfillers; aiming to trend toward this target percentage of distributed fulfillment, this slider allows you to get more granular for the fulfillment process. If set to 0%, all orders will be Seller Exclusive - if set to 100%, all orders will be Available to Fulfillers.
- Consider Self-Owned Fulfillers as Seller-Fulfilled: When enabled, self-owned Fulfillers will be included in the Sellers’s count for the order distribution ratio. This field can be used for Corporate stores vs Independent stores, for more information please contact quivers@support.com
- Enable Fulfiller Inventory: Storefronts must use fulfiller inventory if they intend to use the Order Auto-Assignment feature. Additionally, if a storefront uses fulfiller inventory, the Fulfiller’s inventory will contribute to whether or not products are considered “In Stock” and available for purchase in the HoverCart. Disable if you want only your warehouse inventory to determine if products are “in stock” in the HoverCart.
- Enable Fulfillment Methods: Select which Fulfillment methods you want to support for this storefront.
- Ship from store- Ship from store is a fulfillment strategy where orders are filled from the store instead of the warehouse. This means shipments are made closer to the customer, so there is less lead time required and potentially less transportation cost associated when filling orders.
- Consumer selected ship from store- The consumer can select which Retailer will ship their order.
- In-store pickup- In-store pickup allows a customer to place an order on the internet and pick it up from a nearby store. Some items drop in price only when you select in-store pickup. Offering store pickup for online orders gives your local customers a convenient alternative to shipping.
- Curbside pickup- A customer places an order online and drives to their local store to pick it up. The customer parks in a designated area near the store entrance, and when the order is ready, a store associate brings the customer's order out to them.
- White Glove Delivery- White Glove delivery is a service that guarantees utmost care in handling materials, especially when in transit.
- Warehouses: Select which warehouses this storefront will be pulling inventory from, if applicable. If your storefront is a HoverCart type, you will need at least one warehouse for products to be sellable. Click here for more information about warehouses.
Below are some additional settings you can configure when editing a Storefront:
- Notifications
- Consumer Groups
- Shopping Limits (If you've created a HoverCart storefront)