
In This Article
- Overview
- Key Terms
- Finding and Connecting with Retailers (Network)
- My Fulfillers: Your Connected Retailers
- Managing an Individual Connection
- Bulk Editing Multiple Retailers
- Disconnecting from a Retailer
- Troubleshooting: Why Isn't a Retailer Receiving Orders?
- Frequently Asked Questions
Overview
Your Fulfiller connections are the Retailers who fulfill your brand's orders on Quivers — shipping from their store, handling in-store or curbside pickup, and more. Everything about those relationships lives under Fulfillers in the left menu of your Quivers Admin Panel, which is split into two views:
- Network — Retailers you are not yet connected with: Retailers available to connect, requests you've sent, and requests Retailers have sent to you.
- My Fulfillers — Retailers you're actively connected with. This is where you configure how each Retailer receives your orders.
Note: "Fulfiller" is Quivers' official platform term for a Retailer, and it's the label you'll see throughout the Admin Panel (Fulfillers, My Fulfillers, Return to My Fulfillers). This article uses "Retailer" for the same business.
Key Terms
|
Term |
What It Means |
|---|---|
|
Retailer / Fulfiller |
A business that claims and fulfills orders on behalf of your brand. |
|
Connection |
The active relationship between your brand and a Retailer. A Retailer must be connected before it can be offered your orders. |
|
Claimed |
A Retailer with an active Quivers account — someone at that business has registered and manages it. |
|
Unclaimed |
A Retailer listing (for example, from an imported dealer list) that no one has registered for yet. Unclaimed Retailers are not offered orders. |
|
Claiming Policy |
A set of rules that determines which of your orders a Retailer can claim and how. See Claiming Policies. |
|
Claiming Region |
A geographic area in which a Retailer is eligible to be offered your orders. See Claiming Regions. |
|
Dealer Locator |
A consumer-facing store locator map on your site that shows participating Retailers. |
|
Store Number |
Your own identifier for a Retailer location, commonly used to match records in your ERP or POS. |
|
Affiliate ID |
A tracking identifier you assign to a Retailer for sales attribution and reporting. |
Finding and Connecting with Retailers (Network)
Use the Network view to discover Retailers on Quivers and to act on connection requests.
1. Click Fulfillers in the left menu, then click Network.
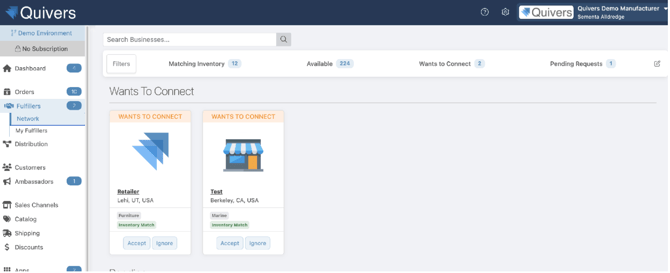
Retailers are shown as cards, grouped into Wants To Connect, Pending, and Available sections. A colored label across the top of each card shows its status (WANTS TO CONNECT, PENDING, or AVAILABLE), and a star at the top left of an Available card marks a Retailer Quivers recommends for your brand. Each card shows the Retailer's logo, name, and city and state, plus badges for their industry. An Inventory Match badge means the Retailer carries products from your catalog.
2. Narrow the list to find the right Retailers.
-
Use Search Businesses... to find a Retailer by name, click a quick filter (see below), or click Filters to narrow by criteria such as Recommendations, Industries, and Location (choose a country, then optionally a state or province).
3. Send a request, or respond to one.
-
Use the buttons at the bottom of a Retailer's card: click Connect (Available), click Accept or Ignore (Wants to Connect), or click Cancel (Pending).
Note: The Network view shows only claimed Retailers — businesses with someone on the other end to respond to your request. Unclaimed listings from an imported dealer list appear in My Fulfillers instead. Once a connection is active, the Retailer moves from Network to My Fulfillers.
Network Quick Filters
The counts across the top of the Network view let you jump straight to a group of Retailers:
|
Quick Filter |
Shows |
What You Can Do |
|---|---|---|
|
Matching Inventory |
Retailers who carry products from your catalog but aren't connected with you yet. |
The fastest way to find Retailers ready to fulfill your orders — click Connect to send a request. |
|
Available |
Claimed Retailers you haven't connected with yet. |
Click Connect on their card to send a connection request. |
|
Wants to Connect |
Retailers who have asked to connect with you. |
Click Accept or Ignore on their card. |
|
Pending Requests |
Requests you've sent that are waiting on the Retailer. |
Wait for the Retailer to respond, or click Cancel to withdraw the request. |
Sending a Connection Request
1. Click the Available quick filter, or scroll to the Available section.
-
Every card here has an AVAILABLE label across the top. Use Matching Inventory instead if you only want Retailers who already carry your products.
2. Review the Retailer's card.
-
Check their location, industry badge, and whether they show an Inventory Match badge. A star in the top left of the card marks a Retailer Quivers recommends for your brand.
3. Click Connect.
-
Your request is sent to the Retailer, and their card moves to the Pending section until they respond. Once they approve it, the Retailer moves to My Fulfillers.
Responding to Connection Requests
1. Click the Wants to Connect quick filter.
-
Each Retailer waiting on you appears under Wants To Connect, with a WANTS TO CONNECT label across the top of their card.
2. Review the Retailer's card.
-
Check their location, industry, and whether they show an Inventory Match badge.
3. Click Accept or Ignore.
Accept creates the connection, and the Retailer moves to My Fulfillers, where you can assign claiming policies, claiming regions, and more. Ignore dismisses the request without connecting.
Best Practice: After you accept a request, open the Retailer in My Fulfillers right away and assign at least one claiming policy and claiming region. A newly connected Retailer isn't eligible for orders until you do.
Canceling a Pending Request
Requests you've sent appear in the Pending section with a PENDING label. The card's Pending button is greyed out while you wait for the Retailer to respond.
1. Click the Pending Requests quick filter, or scroll to the Pending section.
2. Click Cancel on the Retailer's card.
The request is withdrawn, and the Retailer returns to the Available section so you can send a new request later.
Customizing the Quick Filter Bar
You can choose which quick filters appear across the top of the Network and My Fulfillers views.
1. Click the edit (pencil) icon at the right end of the quick filter bar.
-
A toggle appears next to each quick filter.
2. Toggle each quick filter on to show it, or off to hide it.
3. Click the checkmark to save your changes, or click the X to cancel.
Note: Hiding a quick filter only removes it from the bar at the top. The Retailers in that group still appear in the view below — for example, hiding Pending Requests doesn't hide the Pending section.
Inviting Retailers to Quivers
If a Retailer you work with isn't on Quivers yet, invite them from the My Fulfillers view.
1. Click Invite at the top of the My Fulfillers table.
2. Enter one or more email addresses.
-
Separate multiple addresses with commas or new lines to invite several Retailers at once.
3. Review the invitation message.
-
The invitation comes pre-filled with default messaging that includes your brand's information. You can edit the message before sending.
4. (Optional) Click Send Preview to check the email first.
-
A preview is sent to you so you can review it in your inbox. Your invitation stays open, so you can return and finish sending.
5. Send the invitation.
-
When an invited Retailer creates their Quivers account from your invitation, the connection with your brand is created automatically — no extra approval is needed on either side.
Importing Your Dealer List
Click Import at the top of the My Fulfillers table to bulk upload the dealers you already work with, using the provided CSV template. You can include each dealer's Store Number in the import. Affiliate ID can't be imported — add it afterward directly in the table.
Imported dealers that don't have an active Quivers account yet appear as Unclaimed until someone at that business registers.
My Fulfillers: Your Connected Retailers
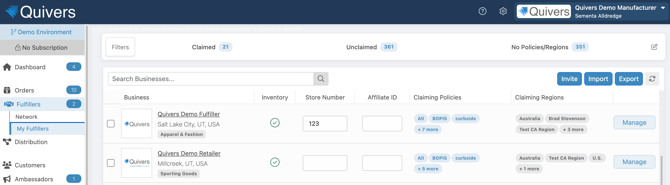
Click Fulfillers in the left menu, then click My Fulfillers to see every Retailer connected to your brand in a single table.
Quick Filters
The counts across the top of the view let you jump straight to the Retailers that need attention:
|
Quick Filter |
Shows |
|---|---|
|
Claimed |
Connected Retailers with an active Quivers account. |
|
Unclaimed |
Connected listings no one has registered for yet. These are marked with a warning icon; hover it to see that the business is unclaimed and won't be offered orders. |
|
No Policies/Regions |
Connected Retailers with no claiming policies and no claiming regions assigned. They won't receive orders until you assign both. |
To choose which of these quick filters appear, see Customizing the Quick Filter Bar.
Best Practice: Check No Policies/Regions after every import or batch of new connections — it's the quickest way to catch Retailers who are connected but completely unconfigured. It won't catch a Retailer who has a claiming policy but no claiming region (or the reverse), so scan the Claiming Policies and Claiming Regions columns in the table for any blank cells too.
Search, Filters, and Table Actions
- Search Businesses... — find a connected Retailer by name.
- Filters — narrow the table by criteria such as Fulfillment Method, Claiming Policy, Claiming Region, Dealer Locator, and Location.
- Invite — invite Retailers to join Quivers by email (see Inviting Retailers to Quivers).
- Import — bulk upload your dealer list by CSV (see Importing Your Dealer List).
- Export — download your connected Retailer list as a CSV.
- Refresh (circular arrows icon) — reload the table with the latest data.
- Checkboxes — select individual Retailers, or use the checkbox in the table header to select all, then update them together with Bulk Edit (see Bulk Editing Multiple Retailers).
Table Columns
|
Column |
Description |
|---|---|
|
Business |
The Retailer's logo, name, city and state, and industry badge. Click the name to open the connection. |
|
Inventory |
A green checkmark means the Retailer has inventory matched to your products. |
|
Store Number |
Editable directly in the table — type in the field to add or change it. |
|
Affiliate ID |
Editable directly in the table — type in the field to add or change it. |
|
Claiming Policies |
The claiming policies assigned to the Retailer. Extra policies are summarized as "+ N more." |
|
Claiming Regions |
The claiming regions assigned to the Retailer, summarized the same way. |
|
Manage |
Opens the Retailer's Manage Connection view. |
Managing an Individual Connection
The Manage Connection view is where you control everything about a single Retailer relationship.
1. In My Fulfillers, click Manage next to the Retailer (or click the Retailer's name).
The Retailer's profile opens with their logo, name, industry, and description at the top. The Manage Connection panel on the left holds the settings covered below; the tabs on the right show the Retailer's details and activity. Each section of the Manage Connection panel is a collapsible section, open by default — click a section's arrow to collapse it.
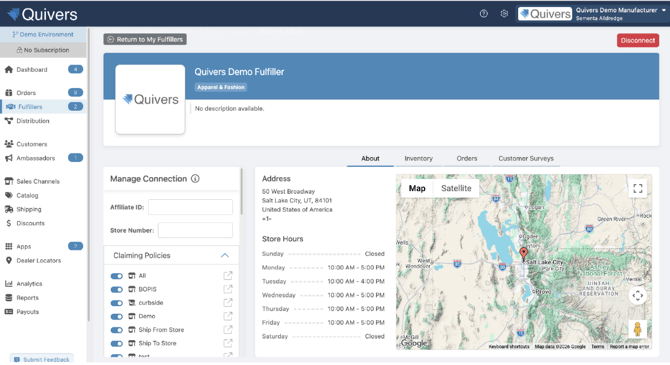
Note: Changes in the Manage Connection panel save automatically — there's no Save button to click. This includes toggles, Store Number, and Affiliate ID.
2. Click Return to My Fulfillers when you're done.
Note: You can only open the Manage Connection view for connected Retailers. A Retailer's name, address, phone, and store hours reflect their actual business, so only the Retailer can change them.
Store Number and Affiliate ID
At the top of the Manage Connection panel, enter or update the Retailer's Store Number and Affiliate ID. These are the same values shown (and editable) in the My Fulfillers table.
Claiming Policies
Toggle each of your claiming policies on or off for this Retailer. A policy that's toggled on applies to the Retailer, determining which of your orders they can claim. Click the open icon next to a policy to view that policy's settings. If a Retailer has no claiming policies assigned, a message in this section lets you know.
For how to create and configure policies, see Claiming Policies.
Claiming Regions
Toggle on each claiming region where this Retailer should be eligible to be offered your orders. Click the edit (pencil) icon next to a region to change that region's settings.
For more on setting up regions, see Claiming Regions.
Dealer Locators
Toggle a Dealer Locator on to add this Retailer to that locator map so shoppers can find them. Toggle it off to remove them from that map — this doesn't affect their ability to fulfill orders. Click the open icon next to a locator to view it.
Note: Individual locator toggles only take effect when the Dealer Locator toggle in the Retailer's Fulfillment Methods section is on. That toggle is the master switch. If it's off, the Retailer won't appear on any of your Dealer Locators, no matter which locators are toggled on here.
B2B Storefronts
Toggle on each B2B storefront this Retailer should have access to for wholesale ordering or dealer replenishment. Storefronts left off aren't available to the Retailer.
Fulfillment Methods
Toggle on each way this Retailer can fulfill your orders. If a method is off here, the Retailer won't be offered orders that use it — even if one of their claiming policies allows that method. The last toggle, Dealer Locator, works differently: it controls locator visibility rather than order fulfillment (see the table below).
|
Fulfillment Method |
What It Covers |
|---|---|
|
Shipping |
The Retailer ships the order directly to the customer (ship-from-store). |
|
In-Store Pickup |
Buy Online, Pick Up In-Store (BOPIS) — the customer collects the order inside the store. |
|
Curbside Pickup |
The customer picks up the order at the curb outside the store. |
|
Reserve Online - Buy In Store |
The customer reserves the item online and pays in store (ROBIS). |
|
Whiteglove Delivery |
Specialized handling, such as assembly or home delivery. |
|
Ship-to-Store |
You ship the order from your warehouse to the Retailer for customer pickup. |
|
Dealer Locator |
The master switch for whether this Retailer can appear on any of your Dealer Locators. When it's off, the Retailer is excluded from every locator, even if individual locators are toggled on in the Dealer Locators section. |
Note: A fulfillment method must be turned on in both places for a Retailer to be offered orders that use it: here in Fulfillment Methods, and in at least one claiming policy assigned to them. For example, if In-Store Pickup is on in their claiming policy but off here, the Retailer won't receive BOPIS orders — and won't appear as a pickup option at checkout.
For a Retailer to be offered an order using a given method, every one of these has to line up:
- Storefront — the method is enabled on the storefront the order comes from. See Marketplaces and Storefronts.
- Connection — the method is toggled on in this Retailer's Fulfillment Methods.
- Claiming Policy — an assigned claiming policy has the method enabled and includes the ordered product.
- Claiming Region — an assigned claiming region covers the customer's location.
If any one of these is off, the Retailer isn't eligible for that method.
Retailer Details Tabs
|
Tab |
What You'll See |
|---|---|
|
About |
The Retailer's address, phone number, store hours, and location map. |
|
Inventory |
The Retailer's inventory records that match your products, as reported by their inventory sync. |
|
Orders |
Orders from your brand that this Retailer has been routed, claimed, shipped, or returned. |
|
Customer Surveys |
Customer feedback on order items this Retailer fulfilled for your brand. |
Bulk Editing Multiple Retailers
To update claiming policies, claiming regions, and Dealer Locators for many Retailers at once, select their checkboxes in My Fulfillers and click Bulk Edit. For the full walkthrough, see Bulk Editing Fulfillers.
Note: Bulk Edit covers claiming policies, claiming regions, and Dealer Locators only. Edit Store Number and Affiliate ID directly in the My Fulfillers table, and configure B2B Storefronts and Fulfillment Methods from each Retailer's Manage Connection view.
Disconnecting from a Retailer
1. In My Fulfillers, find the Retailer and click Manage.
Use Search Businesses... to find them quickly.
2. Click the red Disconnect button in the top right.
3. Confirm that you want to disconnect.
You're returned to My Fulfillers. The Retailer is no longer connected and won't be offered your orders. To work with them again later, find them in Network and click Connect.
Best Practice: Before disconnecting, check the Retailer's Orders tab for any open orders they've claimed, and make sure those are resolved first. See Orders in Quivers.
Troubleshooting: Why Isn't a Retailer Receiving Orders?
If a connected Retailer isn't being offered your orders, work through these checks in order:
|
Check |
Where to Look |
Fix |
|---|---|---|
|
Is the Retailer claimed? |
Unclaimed quick filter, or a warning icon next to their name |
Invite them so someone registers the business. |
|
Do they have claiming policies and regions? |
The Claiming Policies and Claiming Regions columns in My Fulfillers, or their Manage Connection view. (The No Policies/Regions quick filter only shows Retailers missing both.) |
Toggle on at least one claiming policy and one claiming region. |
|
Does a region cover the customer? |
Claiming Regions in Manage Connection |
Turn on a region that includes the customer's location. |
|
Is the fulfillment method on in both places? |
Fulfillment Methods in Manage Connection, and the Retailer's assigned claiming policies |
Turn on the method the order uses (e.g., In-Store Pickup) on the connection and in at least one assigned claiming policy. |
|
Does their claiming policy include the product? |
The Retailer's assigned claiming policies |
Make sure an assigned policy with the right fulfillment method includes the ordered product. |
|
Is the method enabled on the storefront? |
The storefront the order came from |
Enable the fulfillment method on that storefront — see Marketplaces and Storefronts. |
|
Is their inventory synced? |
Inventory column in My Fulfillers, or the Inventory tab |
Ask the Retailer to connect or refresh their inventory — see Inventory in Quivers. |
For how Quivers decides which Retailer is offered an order, see Order Routing.
Frequently Asked Questions
Is a "Fulfiller" the same thing as a "Retailer"?
Yes. Fulfiller is Quivers' platform term and the label used in the Admin Panel. Retailer, dealer, and similar terms all describe the same business.
What's the difference between Network and My Fulfillers?
Network shows Retailers you aren't connected with yet, including requests you've sent and requests sent to you. My Fulfillers shows your active connections and is where you configure them.
Why don't I see unclaimed Retailers in Network?
Network shows only claimed Retailers, since an unclaimed listing has no one to respond to a connection request. Unclaimed listings from your imported dealer list appear in My Fulfillers.
Will an unclaimed Retailer receive my orders?
No. Unclaimed Retailers aren't offered orders. Invite them so someone at the business registers and claims it.
What does the Matching Inventory quick filter show?
Retailers on Quivers who carry products from your catalog but aren't connected with you yet. It's the quickest way to find Retailers who are ready to fulfill your orders.
How do I respond when a Retailer asks to connect?
In Network, click Wants to Connect, then click Accept or Ignore on the Retailer's card. Accepted Retailers move to My Fulfillers.
How do I send a connection request to a Retailer?
In Network, find the Retailer in the Available section (or click Available or Matching Inventory) and click Connect on their card. The card moves to Pending until the Retailer responds.
How do I cancel a connection request I sent?
In Network, find the Retailer in the Pending section (or click Pending Requests) and click Cancel on their card.
What does the star on a Retailer's card mean?
It marks a Retailer Quivers recommends for your brand.
Can I hide quick filters I don't use?
Yes. Click the pencil icon at the right end of the quick filter bar, toggle quick filters on or off, and click the checkmark to save. Hidden quick filters only disappear from the bar; those Retailers still show in the view.
Can I invite several Retailers at once?
Yes. In the Invite window, separate email addresses with commas or new lines.
Can I see the invitation before I send it?
Yes. Click Send Preview to email yourself a copy. Your invitation stays open so you can finish sending.
Do I have to approve Retailers who sign up from my invitation?
No. When an invited Retailer creates their account from your invitation, the connection is created automatically.
Can I import Affiliate IDs with my dealer list?
No. Store Number can be imported, but Affiliate ID must be added in the My Fulfillers table or the Retailer's Manage Connection view.
What does "No Policies/Regions" mean?
It shows connected Retailers that have no claiming policies and no claiming regions assigned at all. A Retailer with only one of the two won't appear there, but still won't receive orders until both are assigned. Check the Claiming Policies and Claiming Regions columns in the table to spot them.
What does the green checkmark in the Inventory column mean?
The Retailer has inventory matched to your products.
Can I open the Manage Connection view for a Retailer I'm not connected with?
No. The Manage Connection view is available only for connected Retailers.
Can I edit a Retailer's address, phone number, or store hours?
No. That information reflects the Retailer's actual business, so only the Retailer can update it.
How do I stop a Retailer from appearing on my Dealer Locator without disconnecting?
To remove them from one specific locator, turn off that locator in the Dealer Locators section of their Manage Connection view. To remove them from all of your locators at once, turn off the Dealer Locator toggle in their Fulfillment Methods section. Either way, they stay connected and can still fulfill orders.
A Retailer is toggled on in the Dealer Locators section. Why aren't they showing on my locator?
Check the Dealer Locator toggle in their Fulfillment Methods section. It's the master switch; if it's off, the Retailer is hidden from every locator regardless of the individual locator toggles.
What's the difference between Claiming Policies and Fulfillment Methods?
Claiming policies set the rules for which of your orders a Retailer can claim, including which fulfillment methods those orders can use. Fulfillment Methods in Manage Connection control which methods that specific Retailer can fulfill. A method has to be on in both places for the Retailer to be offered orders that use it.
A Retailer's claiming policy includes In-Store Pickup. Why aren't they getting BOPIS orders?
Check the Fulfillment Methods section of their Manage Connection view. If In-Store Pickup is off there, they won't be offered BOPIS orders, even though their claiming policy allows it.
Do I need to save changes in the Manage Connection view?
No. Toggles, Store Number, and Affiliate ID all save automatically as you change them.
Can I update many Retailers at once?
Yes, for claiming policies, claiming regions, and Dealer Locators. Select Retailers in My Fulfillers and click Bulk Edit — see Bulk Editing Fulfillers.
Can I bulk edit Store Numbers or Fulfillment Methods?
No. Edit Store Number and Affiliate ID directly in the My Fulfillers table, and set Fulfillment Methods and B2B Storefronts in each Retailer's Manage Connection view.
What happens when I disconnect from a Retailer?
The connection ends and the Retailer is no longer offered your orders. You're returned to My Fulfillers.
Can I reconnect with a Retailer later?
Yes. Find them in Network and click Connect on their card.
A connected Retailer isn't getting orders. What should I check?
Confirm they're claimed; have a claiming region covering the customer; have the right fulfillment method on in their connection, in an assigned claiming policy that includes the product, and on the storefront; and have synced inventory. See Troubleshooting above.