
In This Article
- What Is a Discount?
- Discount Types
- How to Create a Discount
- Configuring Your Discount
- Bypass Connections & Discount Requires Code
- Codes
- Exporting Codes
- Duration
- Discount Type & Storefront
- Limits
- Troubleshooting
- Frequently Asked Questions
What Is a Discount?
Discounts in Quivers let a brand offer customers a lower sale price when purchasing through the HoverCart. A discount is typically scoped to a single marketplace/storefront, and can either apply automatically to every qualifying cart or be activated using a discount code.
The discount engine itself is built for HoverCart purchases - a Quivers discount doesn't apply directly to orders placed through a plugin (like Shopify or WooCommerce). That said, plugin orders can still be linked to a discount code for affiliate tracking purposes: an Ambassador/Affiliate program can set up an "External Discount" affiliate code that isn't mapped to any Quivers discount, so that a matching code used on a plugin order is tracked as an affiliate sale. See How to Set Up an ARM Portal for Affiliate Tools in Quivers for details.
Note: For plugin storefronts (Shopify, WooCommerce, etc.), a plugin order that comes in using a discount/coupon code matching an active code on one of your Quivers discounts will inherit that discount's Bypass Connections setting — so if Bypass Connections is turned On for that discount, the matching plugin order becomes Seller Exclusive too, the same as it would in the HoverCart.
How It Works
Every discount you create is defined by:
- Which storefront/marketplace the discount applies to
- Whether it requires a discount code to activate, or applies automatically
- Its valid time frame (Duration)
- Its type — which determines what has to be true about the cart for the discount to trigger (Category, Customer, Order, Product, or Bundle)
- The amount discounted — a % or $ off the relevant items, or for Bundle discounts, a fixed total cost
- Optional Limits on how the discount can be used, or how much it can save
Why It Matters
Well-configured discounts help drive conversion and move specific inventory without needing engineering changes for every promotion. Because a discount can be scoped to a storefront, a customer group, or a set of products or categories, brands can run tightly targeted promotions rather than a single one-size-fits-all sale.
Discount Types
Quivers supports five discount types. Each type looks at a different condition to decide whether it should trigger:
- Category Discount — triggers when the cart contains items from one or more selected product categories. See How to Create a Category Discount.
- Customer Discount — triggers based on the consumer group the purchasing customer belongs to. See How to Create a Customer Discount.
- Order Discount — triggers based on the order's total quantity or price. See How to Create an Order Discount.
- Product Discount — triggers when the cart contains specific products you've selected. See How to Create a Product Discount.
- Bundle Discount — triggers when the cart contains a qualifying combination of items across several selected categories. See How to Create a Bundle Discount.
How to Create a Discount
- Navigate to Discounts in the left-hand menu of your Quivers Panel.
- Click the blue Add Discount button in the upper right-hand corner; this opens a pop-up with a single field, Discount Name.
- Name your discount and click Add Discount to save.
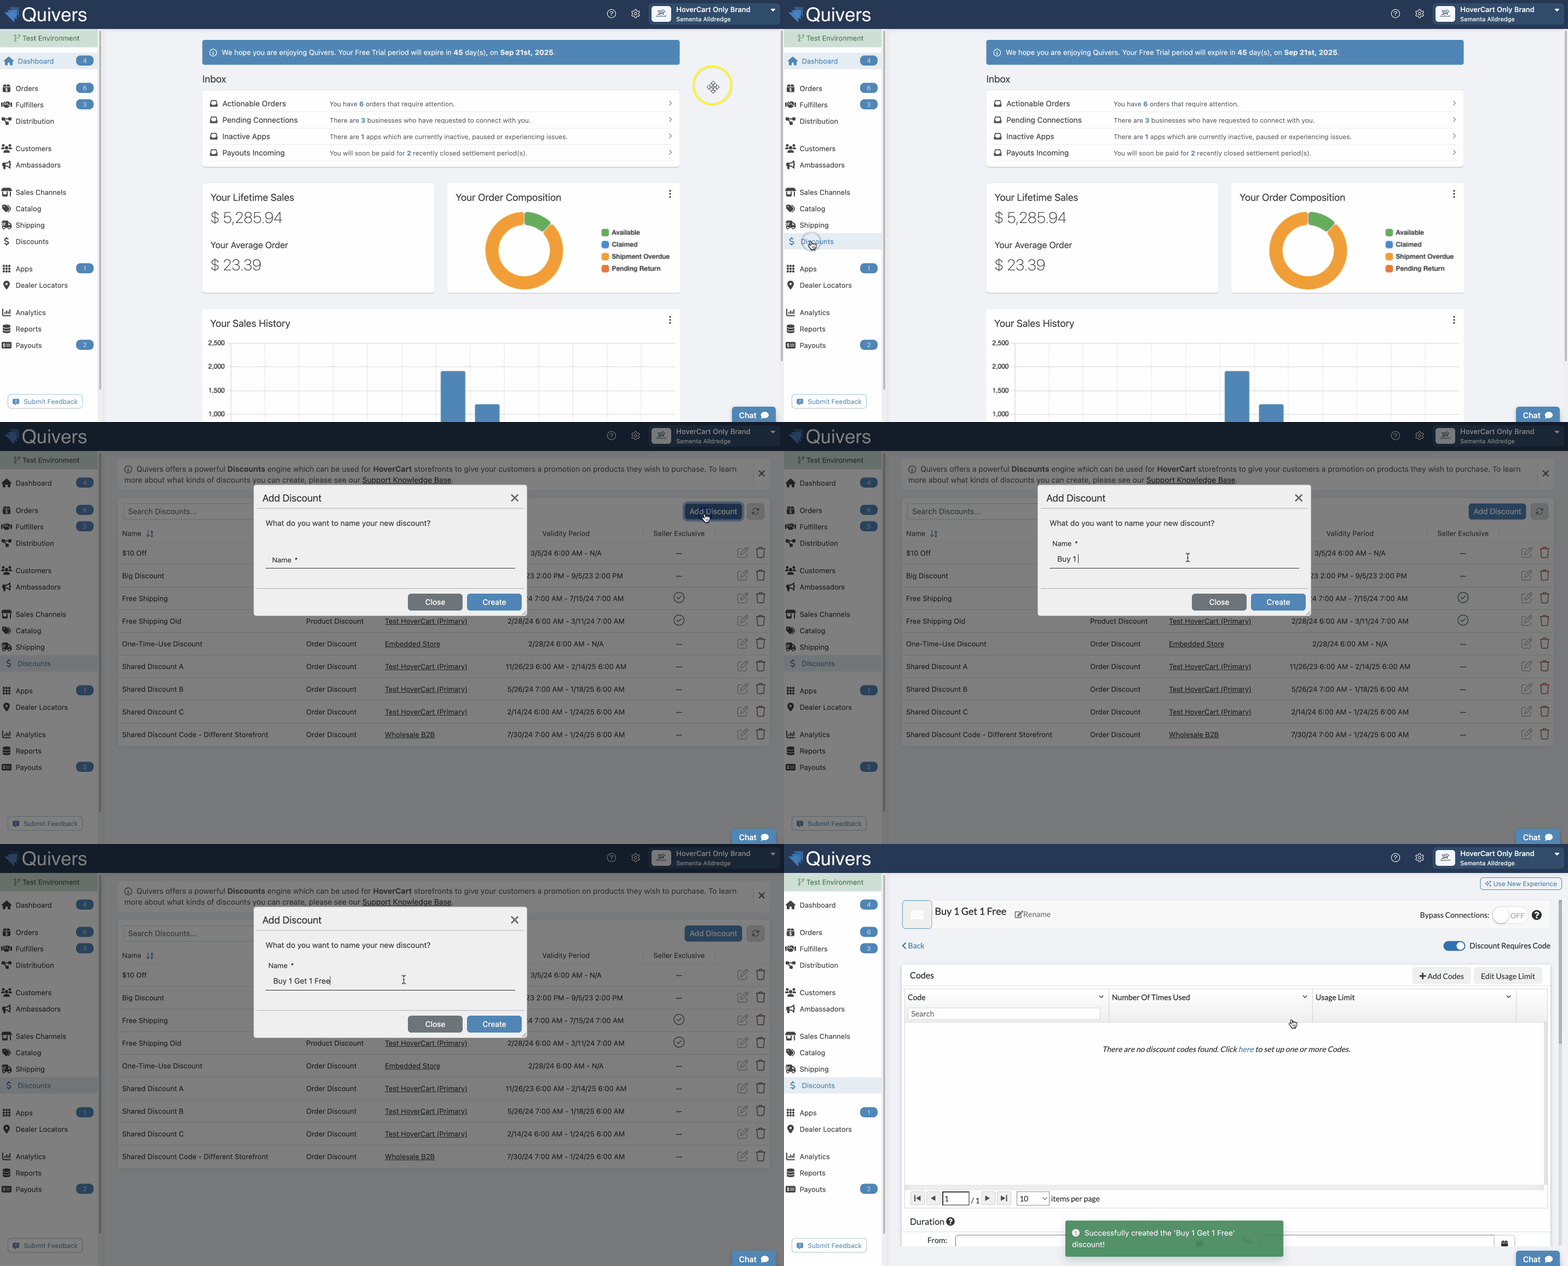
Helpful Tip: To rename a discount later, click the pencil icon to the right of the discount name. To delete a discount, click the red trash can icon.
Configuring Your Discount
Once your discount is created, the Edit Discount screen has several sections to configure.
Bypass Connections & Discount Requires Code
These two toggles sit together at the top of the Edit Discount screen, next to the discount's name.
- Bypass Connections — controls whether orders using this discount are made available to your retailers/Fulfillers, or are kept exclusive to you as the seller. Leave it Off to distribute orders to retailers/Fulfillers as usual; switch it On to bypass them and keep those orders exclusive to you. This also applies to plugin orders (Shopify, WooCommerce, etc.) — if an incoming plugin order uses a code that matches an active code on this discount, it inherits this Bypass Connections setting too.
- Discount Requires Code — explicitly marks whether this discount needs an active code to activate. Turn this On for any discount that should only work when a customer enters a code.
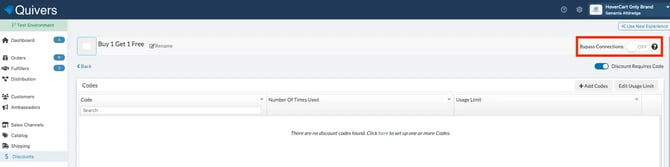
Note: Make sure a discount that's meant to require a code always has Discount Requires Code turned On and at least one active code. If every code for a discount is removed — for example, an ambassador/affiliate program removing codes as consumers leave a group — a discount without Discount Requires Code turned on could unintentionally start applying automatically to every cart instead of just the intended customers. If a discount currently has zero codes, the Quivers Panel shows a warning right on the Edit Discount screen: "This discount has no codes created for it. If a discount has no codes, it will be considered as a global discount which will be automatically applied to all possible carts." This warning disappears as soon as you add at least one code.
Codes
Use this section to create the coupon code(s) your customers will enter to activate the discount.
- Click the gray Add Codes button and enter the code in the Discount Code field.
- Optionally set a Usage Limit to cap how many times an individual customer can use the code (or click Edit Usage Limit to adjust it later).
- Click Add Code to save.
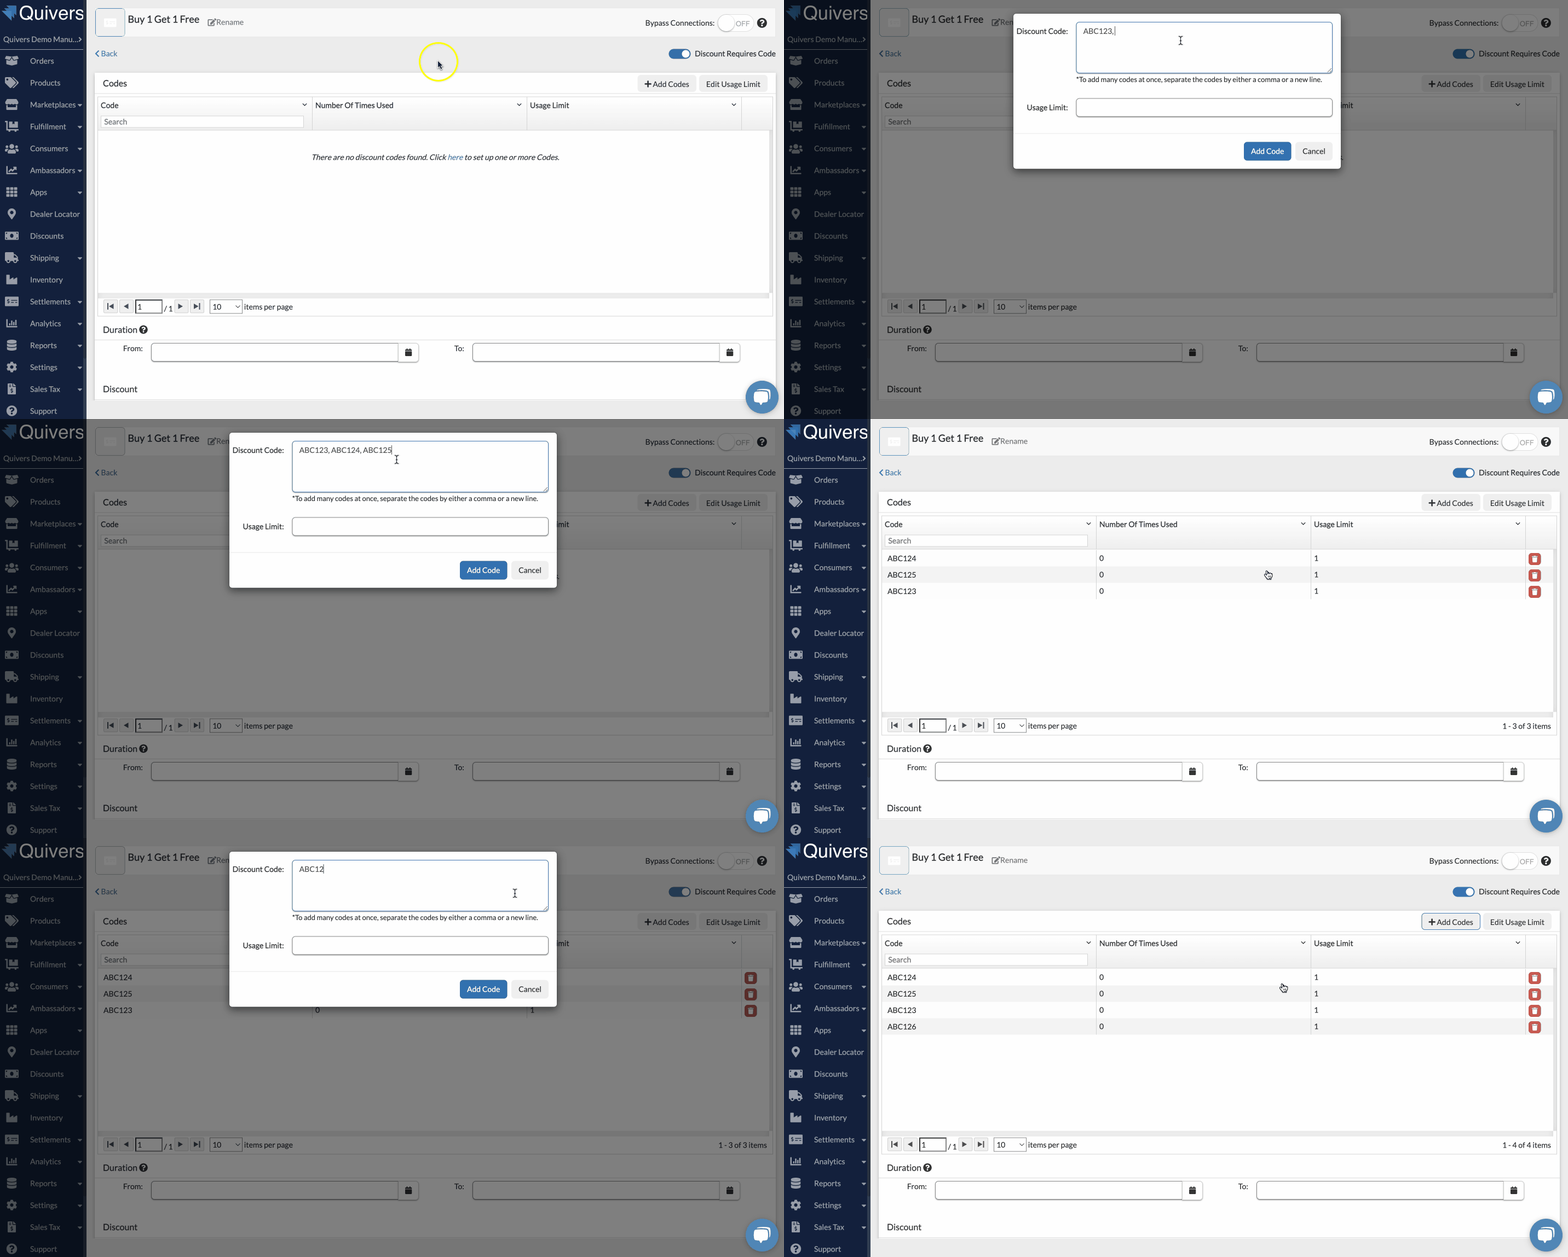
Helpful Tip: You can bulk-load codes instead of adding them one at a time — paste multiple codes into a single field to mass-import them.
Note: If a code was generated through an Ambassador program's Affiliate Code feature, it appears here as a clickable link that opens that consumer's profile in a new tab, rather than as plain text. See How to Set Up an ARM Portal for Affiliate Tools in Quivers for how these ambassador-linked codes are created.
Exporting Codes
Click the Export button in the Codes panel header (next to Add Codes and Edit Usage Limit) to download every code for this discount as a CSV file named discount-codes-[discount-id].csv. The button shows Exporting... while it downloads, then returns to Export when it's done.
- The export includes all codes on the discount, not just the codes visible on the current page of the table — useful since the Codes table is paginated.
- The CSV includes three columns: Code, Times Used, and Usage Limit.

Helpful Tip: Exporting is a quick way to audit a discount's codes — for example, to check for codes that look merged or duplicated — without having to page through the table or contact support.
Duration
Choose the time period during which the discount should run. You can set the range in hours or days — for an hourly discount, set the From and To dates to the same day.

Discount Type & Storefront
- Select the Storefront the discount should apply to from the Applies To dropdown.
- Select one of the five Discount Types (see Discount Types above). Each type has its own article covering its specific configuration steps.
Limits
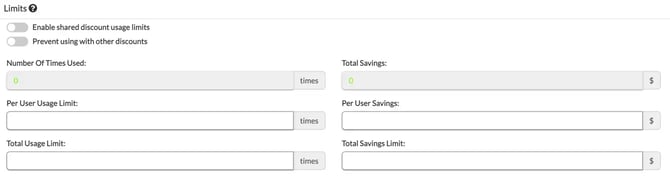
Discount Limits let you restrict how a discount can be used. Number Of Times Used and Total Savings are read-only counters showing what's already happened; the rest are settings you configure:
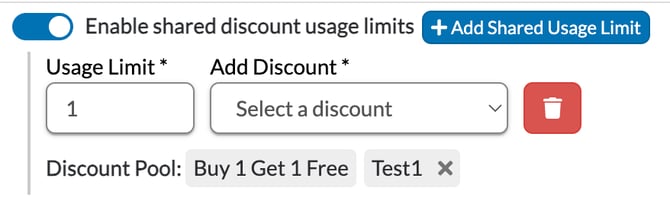
- Enable shared discount usage limits — Links this discount to other discounts you select, so all of them share a usage limit — a "pool." Click Add Shared Usage Limit to start a pool: enter a Usage Limit and pick a discount from the Add Discount dropdown to add it (the trash icon removes that row before you save). Everything currently in that pool is listed under Discount Pool as removable tags. For example, with a shared limit of 1 across Discounts A, B, and C, a customer who uses any one of them can no longer use the other two.
- A discount isn't limited to one pool — clicking Add Shared Usage Limit again starts a separate, independent pool with its own usage limit and its own set of discounts. For example, Discount D could share a limit of 4 with Discounts E and F in one pool, and separately share a limit of 2 with Discount A in a second pool — both active on D at the same time, checked independently of each other.
- Prevent using with other Discounts — Controls whether this discount can be combined with other discounts.
- Per User Usage Limit — Caps how many times a single customer may use this discount.
- Total Usage Limit — Caps how many times the discount can be used in total.
- Per User Savings — Caps how much a single customer can have discounted in total.
- Total Savings Limit — Caps how much the discount can save in total.
Note: Don't combine Prevent Using with Other Discounts with a shared usage-limit pool on the same discount — the two can interfere with each other and produce unreliable results. Also note that shared usage limits identify customers by account, so they work reliably on logged-in/private storefronts; in a guest checkout, a customer could bypass the limit by using a different email address. If a discount is deleted, it's automatically removed from any pool it belonged to.
Note: If you're building a "use this discount or that one, not both" promotion with a shared usage limit pool, give each pooled discount its own distinct code — don't reuse the same code across multiple discounts in the same pool. Quivers adds every discount that matches an entered code to the cart at once, so a shared code on pooled discounts can trigger more than one of them simultaneously, which conflicts with the shared limit. If that happens, Quivers automatically disables discounts until the shared limit is satisfied rather than blocking checkout, but which discount gets disabled in a tie isn't guaranteed to be predictable — so it's best avoided by using separate codes per discount in the pool.
Troubleshooting
1. My discount isn't applying to any carts
- Confirm the discount's Duration includes the current date and time.
- Confirm the correct Storefront is selected under Applies To.
- If the discount requires a code, confirm at least one code is active and hasn't been removed.
2. My discount is applying automatically when it shouldn't
- Confirm Discount Requires Code is turned On — a discount with zero codes but this toggle Off can apply to every cart.
3. Orders with this discount aren't reaching my Fulfillers
- Check the Bypass Connections toggle — if it's On, this discount is intentionally keeping its orders exclusive to you as the seller, bypassing retailers/Fulfillers. Turn it Off if you want those orders distributed to retailers as usual.
Frequently Asked Questions
Q: Can I use more than one discount type at once?
A: Each discount you create has a single type. To combine effects — for example, a category discount and an order discount — create separate discounts and use the Limits settings to control whether they can stack.
Q: Do discounts apply to plugin-based storefronts?
A: Not directly — the discount engine applies to HoverCart purchases, not orders placed through a plugin (Shopify, WooCommerce, etc.). However, an Ambassador/Affiliate program can create an "External Discount" affiliate code that isn't mapped to any Quivers discount, so that a matching code used on a plugin order is still tracked as an affiliate sale. See How to Set Up an ARM Portal for Affiliate Tools in Quivers.
Q: What happens if I don't require a code and don't add any codes?
A: The discount is treated as automatic and applies to any cart that meets its criteria.
Q: Can I bulk-import discount codes instead of adding them one at a time?
A: Yes. Paste multiple codes into a single field in the Codes section to mass-import them.
Q: Can I use Prevent Using with Other Discounts together with a shared usage-limit pool?
A: Not reliably — the two settings can interfere with each other. If you want several discounts to share one usage limit, use the shared usage limit pool on its own and leave Prevent Using with Other Discounts off for those discounts.
Q: I want customers to use Discount A or Discount B, but not both — how should I set that up?
A: Put both discounts in the same shared usage limit pool with a limit of 1, and give each one its own distinct code. Don't give them the same code — a shared code adds every matching discount to the cart at once, which conflicts with the shared limit and leads to unpredictable results.